
Slow Cooker Recipes: Easy Meals, Less Effort!
Family-friendly dishes for busy people — quick prep, delicious results.
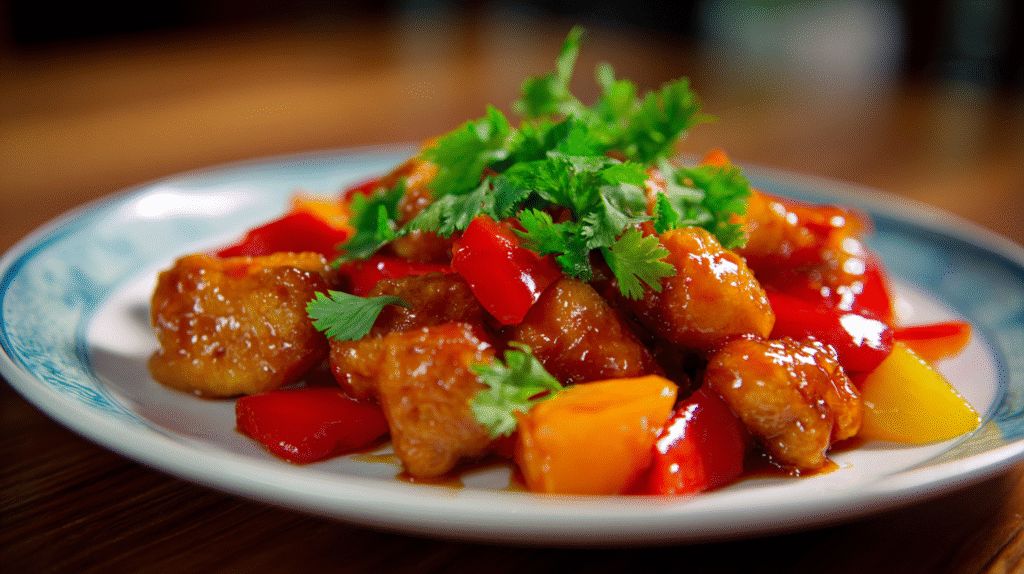
Grab yours for $4What Makes This Sweet and Sour Chicken Recipe Special
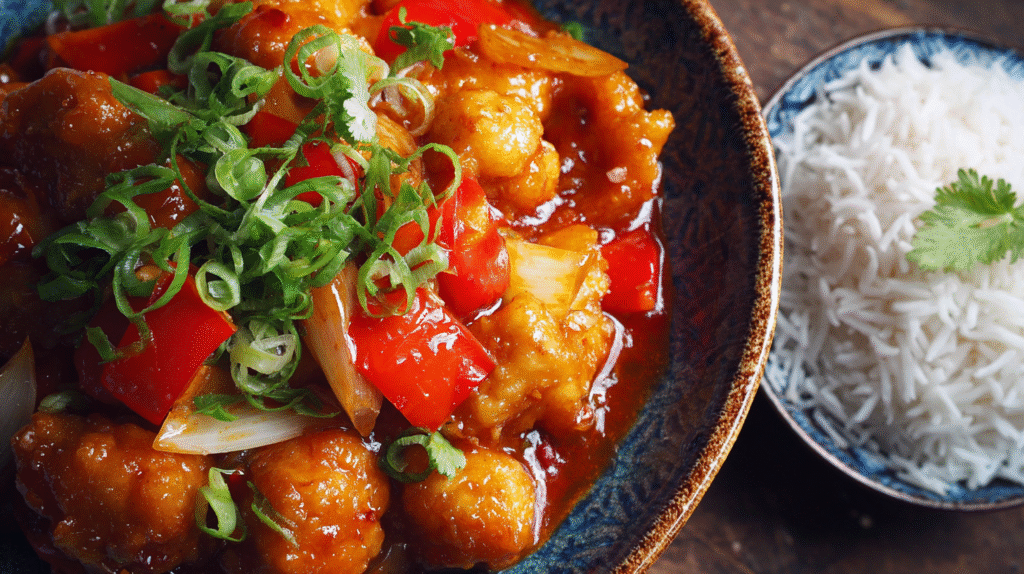
This sweet and sour chicken recipe stands out from restaurant versions with its perfect balance of flavors and textures that you simply can’t get from takeout. The chicken pieces develop an incredibly crispy exterior while maintaining juicy tenderness inside thanks to the double-coating technique. You’ll appreciate how the homemade sauce avoids the cloying sweetness found in many commercial versions by incorporating fresh pineapple juice and rice vinegar for authentic tanginess.
The preparation method ensures restaurant-quality results without deep frying. Your chicken gets a golden brown finish through pan-frying which requires less oil while still delivering that satisfying crunch. The sauce thickens to the ideal consistency that clings to each piece rather than pooling at the bottom of your plate.
Fresh ingredients elevate this dish beyond typical takeout fare. Bell peppers maintain their vibrant color and slight crispness while onions add aromatic depth to complement the sauce. The dish comes together in under 40 minutes making it practical for weeknight dinners yet impressive enough for guests. This recipe gives you complete control over ingredient quality and nutritional content without sacrificing the classic sweet and sour flavor profile you crave.


Ingredients You’ll Need

Creating this restaurant-quality sweet and sour chicken at home requires a few key components. Let’s break down everything you’ll need to prepare this delicious dish.
For the Chicken
- 1½ pounds boneless skinless chicken breasts cut into 1-inch chunks
- 2 large eggs beaten
- ½ cup all-purpose flour
- ½ cup cornstarch
- ½ teaspoon salt
- ¼ teaspoon white pepper
- 3 tablespoons vegetable oil for pan-frying
For the Sweet and Sour Sauce
- ¾ cup pineapple juice (fresh is best but canned works too)
- ⅓ cup rice vinegar
- ¼ cup brown sugar packed
- 3 tablespoons ketchup
- 2 tablespoons soy sauce (low sodium preferred)
- 1 tablespoon cornstarch mixed with 2 tablespoons water
- 1 red bell pepper cut into 1-inch chunks
- 1 green bell pepper cut into 1-inch chunks
- 1 medium yellow onion cut into 1-inch pieces
- 1 cup pineapple chunks (fresh delivers the best flavor)
- 2 cloves garlic minced
- 1 teaspoon fresh ginger grated
For Garnish
- 2 green onions thinly sliced
- 1 tablespoon toasted sesame seeds
- Fresh cilantro leaves chopped (optional)
- Red pepper flakes for those who enjoy extra heat (optional)


Kitchen Tools Required
Preparing sweet and sour chicken efficiently requires several key kitchen tools that streamline the cooking process. Gather these essentials before starting your culinary adventure:
- Large mixing bowls – You’ll need at least two separate bowls for the chicken coating process and another for mixing the sauce ingredients
- Measuring cups and spoons – Precise measurements ensure balanced sweet and sour flavors
- Sharp chef’s knife – Essential for cutting chicken breasts into even bite-sized pieces
- Cutting board – Preferably two separate ones for meat and vegetables to prevent cross-contamination
- Large non-stick skillet or wok – A 12-inch skillet with high sides works perfectly for both frying chicken and combining all ingredients
- Wooden spoon or heat-resistant spatula – For stirring the sauce and tossing the chicken without scratching your cookware
- Tongs – Helpful for flipping and removing chicken pieces during frying
- Small whisk – For thoroughly combining sauce ingredients and cornstarch slurry
- Paper towel-lined plate – To drain excess oil from fried chicken pieces
- Garlic press – Optional but useful for mincing garlic quickly
- Microplane or fine grater – For fresh ginger if using instead of ground ginger
- Small bowl – For preparing the cornstarch slurry to thicken your sauce
Having these tools ready ensures your sweet and sour chicken preparation flows smoothly from prep to plating without any interruptions or kitchen scrambling.


Preparation Tips
Mastering the prep work is crucial for creating perfectly balanced sweet and sour chicken. These techniques will help you achieve restaurant-quality results while maintaining efficiency in the kitchen.
How to Cut the Chicken
For the best texture in your sweet and sour chicken start with cold chicken that’s easier to slice precisely. Cut your boneless skinless chicken breasts into uniform 1-inch cubes to ensure even cooking throughout. Trim away any visible fat or tendon tissue before cutting to keep the meat tender. Place your chicken on a cutting board and slice against the grain to maximize tenderness. If the chicken feels slippery making it difficult to cut try partially freezing it for 15-20 minutes first. Remember that consistent sizing is key—pieces that are too large will remain undercooked in the center while smaller pieces may become tough and dry during frying.
Prepping the Vegetables
Fresh vibrant vegetables form the backbone of authentic sweet and sour chicken. Cut bell peppers into 1-inch squares by first removing the stem and seeds then slicing into strips before cutting crosswise. Dice onions into similar-sized chunks that will cook at the same rate as your peppers. Pineapple pieces should be cut slightly smaller (about ¾-inch) since they’re softer than the other components. Pat all vegetables dry with paper towels before cooking to prevent oil splattering and ensure proper caramelization. Keeping your vegetable pieces uniform not only creates a visually appealing dish but also guarantees everything cooks evenly. Prepare all vegetables before starting to cook the chicken so they’re ready to add at the perfect moment during the stir-frying process.


Making the Perfect Batter
The batter is what transforms ordinary chicken pieces into the crispy golden morsels that make sweet and sour chicken irresistible. Creating the ideal coating requires attention to detail and proper technique to achieve that restaurant-quality crunch while keeping the chicken juicy inside.
Start with a dry-wet-dry dredging method that builds layers of texture. First mix 1 cup all-purpose flour with 2 tablespoons cornstarch salt and pepper in a shallow bowl. This combination creates a coating that turns wonderfully crisp when fried while the cornstarch prevents the batter from becoming too heavy.
In a separate bowl whisk together 2 eggs with 3 tablespoons water until completely blended. This egg wash helps the final coating adhere properly to the chicken pieces ensuring you get that perfect crispy shell.
For the final coating mix another 1 cup flour with ½ cup cornstarch plus 1 teaspoon baking powder. The addition of baking powder creates tiny air pockets when the batter hits the hot oil resulting in an extra-light crispy texture that stays crunchy even after being tossed in sauce.
Temperature plays a crucial role in batter success. Your chicken should be at room temperature before coating as cold chicken can cause the batter to separate or not adhere properly. Meanwhile keep the prepared batter chilled to prevent it from becoming gummy when it meets the hot chicken.
Work in small batches when coating your chicken pieces to prevent clumping. Thoroughly shake off excess flour between each step of the dredging process to avoid heavy uneven coating that might become soggy when sauced.
Allow the coated chicken to rest on a wire rack for 5-10 minutes before frying. This resting period helps the coating set properly and adhere to the chicken resulting in less separation during cooking and a more uniform crispy exterior.
The final secret to perfect sweet and sour chicken batter lies in the frying technique. Heat your oil to exactly 350°F (175°C) before adding the chicken. Oil that’s too cool will create greasy chicken while overheated oil will burn the coating before the interior cooks through.


Frying the Chicken to Crispy Perfection
Now that your chicken pieces are perfectly coated with batter it’s time to transform them into golden nuggets of crispy delight. Heat your oil in a large nonstick skillet or wok over medium-high heat until it reaches approximately 350°F (175°C). You can test the oil temperature by dropping a small piece of batter into the pan—when it sizzles immediately without burning the oil is ready.
Work in batches of 8-10 pieces at a time to avoid overcrowding the pan. Overcrowding causes the oil temperature to drop significantly resulting in soggy rather than crispy chicken. Carefully add the coated chicken pieces one by one leaving space between each piece.
Allow the chicken to cook undisturbed for about 2-3 minutes until the bottom develops a golden brown crust. Using tongs gently flip each piece and continue cooking for another 2-3 minutes until all sides are evenly crispy and the internal temperature reaches 165°F (74°C).
Remove the fried chicken pieces and place them on a wire rack set over a baking sheet rather than on paper towels. This crucial step allows air to circulate around the chicken keeping all sides crispy instead of becoming soggy on the bottom.
Between batches use a slotted spoon to remove any floating bits of batter from the oil. These burnt pieces can impart a bitter flavor to subsequent batches. Maintain the oil temperature by allowing it to reheat for about 30 seconds between batches.
For extra crispiness you can double-fry the chicken. After frying all batches once allow the chicken to rest for 5 minutes then return it to the hot oil for a quick 1-minute second fry. This technique creates an extraordinarily crunchy exterior while maintaining juicy chicken inside.
If you need to keep the chicken warm while preparing the sauce place the wire rack and baking sheet in a 200°F (95°C) oven. This low temperature maintains crispiness without continuing to cook the chicken. Avoid covering the chicken with foil as this traps steam and softens the coating.
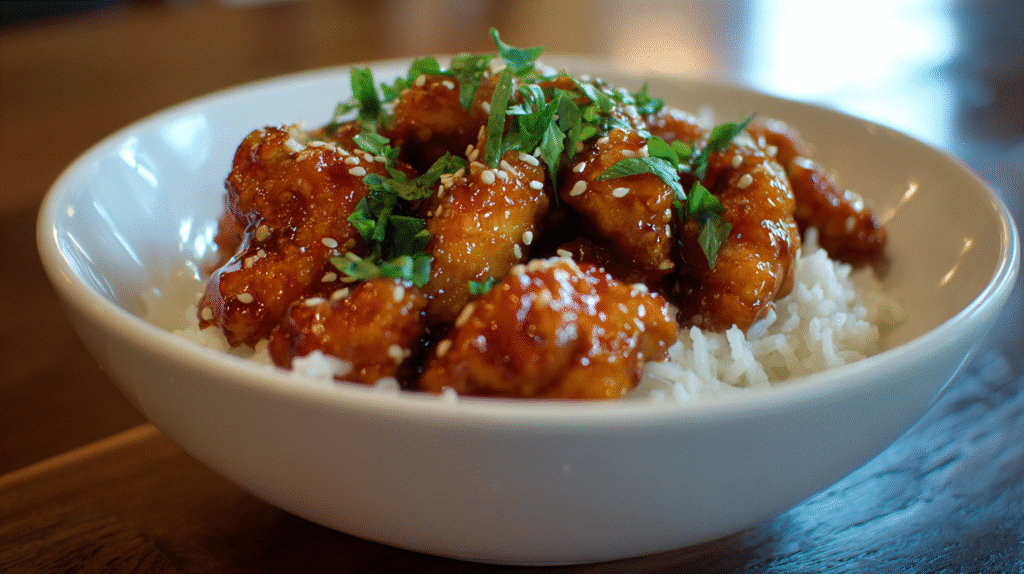
The perfectly fried chicken should have a satisfying crunch when bitten into revealing tender juicy meat inside. This textural contrast is the hallmark of exceptional sweet and sour chicken and worth the extra attention to detail during the frying process.


Creating the Sweet and Sour Sauce
The hallmark of exceptional sweet and sour chicken lies in its vibrant sauce that perfectly balances tangy and sweet flavors. Start by heating 1 tablespoon of oil in your wok or skillet over medium heat. Add 2 cloves of minced garlic and 1 teaspoon of grated ginger allowing them to sizzle for about 30 seconds until fragrant but not browned.
Pour in ¾ cup pineapple juice (fresh yields better flavor than canned) and ¼ cup rice vinegar which provides the signature tanginess. Stir in 3 tablespoons ketchup 2 tablespoons brown sugar 1 tablespoon honey and 1 tablespoon soy sauce. This combination creates the perfect sweet-sour balance without becoming cloyingly sweet like many restaurant versions.
Bring the mixture to a gentle simmer for 2-3 minutes allowing the flavors to meld together. Mix 1 tablespoon cornstarch with 2 tablespoons cold water in a small bowl until completely smooth. Whisk this slurry into your simmering sauce in a thin stream being careful not to add it all at once.
Continue cooking for another 2-3 minutes while stirring constantly. The sauce will transform before your eyes becoming glossy and thickened to the perfect consistency that will cling beautifully to your crispy chicken pieces. You’ll know it’s ready when it coats the back of a spoon and a line drawn through it holds its shape.
For a more vibrant appearance add a few drops of red food coloring if desired though this is optional and purely aesthetic. The natural color from the ketchup and pineapple juice creates an appealing amber hue on its own.
Test the balance of flavors before finalizing your sauce. If it tastes too sweet add a splash more vinegar. Should it be too tangy incorporate an additional teaspoon of brown sugar or honey. Remember that the sauce will slightly intensify in flavor as it reduces so adjust accordingly.
Transfer the thickened sauce to a clean bowl if you plan to use the same pan for stir-frying your vegetables. This prevents the sauce from burning or over-reducing while you complete the other components of the dish. Your homemade sweet and sour sauce will maintain its perfect consistency for up to 30 minutes at room temperature or can be gently reheated if prepared further in advance.


Putting It All Together
Now that you have your crispy chicken and flavorful sauce prepared it’s time to combine everything into that classic sweet and sour chicken dish you’ve been craving. Follow these steps to achieve restaurant-quality results in your own kitchen:
- Heat 1 tablespoon of oil in your wok or large skillet over medium-high heat until shimmering.
- Add your bell peppers and onions to the hot pan and stir-fry for 2-3 minutes until they begin to soften but still maintain some crispness. The vegetables should develop slight charring on the edges.
- Toss in your diced pineapple chunks (if using fresh) and stir-fry for an additional minute to warm through.
- Pour your prepared sweet and sour sauce into the skillet with the vegetables and bring to a gentle simmer.
- Allow the sauce to bubble for about 30 seconds until it thickens slightly and becomes glossy.
- Add your crispy fried chicken pieces to the pan right before serving. Gently toss everything together using tongs or a wooden spoon to coat the chicken evenly with sauce.
- Cook for just 30-45 seconds more to warm everything through without softening the chicken’s crispy coating.
- Remove from heat immediately to preserve the textural contrast between the crispy chicken and the tangy sauce.
- Transfer to a serving platter and garnish with thinly sliced green onions and sesame seeds for visual appeal and added flavor.
For optimal results serve your sweet and sour chicken immediately over steamed white rice or noodles. The contrast between the crispy chicken juicy vegetables and tangy-sweet sauce creates that perfect balance of textures and flavors that makes this dish so irresistible. The sauce will continue to thicken as it cools so timing is everything when combining all elements.
If you need to prepare components ahead of time keep the fried chicken separate from the sauce and vegetables until the very last moment. This prevents the crispy coating from becoming soggy and maintains that delightful crunch that distinguishes truly excellent sweet and sour chicken from mediocre versions.


Serving Suggestions
Transform your sweet and sour chicken into a complete meal with these perfect pairing ideas. White jasmine or basmati rice provides the ideal neutral base that soaks up the flavorful sauce while allowing the chicken to remain the star attraction. Brown rice offers a heartier alternative with added nutritional benefits for those seeking a healthier option.
Noodles create an exciting textural contrast to the crispy chicken. Try serving your sweet and sour chicken over chow mein noodles or rice noodles for an authentic Asian-inspired meal. The sauce clings beautifully to the noodles creating delicious flavor in every bite.
Boost the nutritional value by adding steamed vegetables alongside your sweet and sour chicken. Broccoli florets steamed to bright green perfection or snow peas add vibrant color and crunch that complement the dish wonderfully. A simple cucumber salad dressed with rice vinegar provides a cooling counterpoint to the sweet and tangy flavors.
Balance the meal with appetizers like spring rolls or crab rangoon for a complete takeout-style experience at home. Vegetable dumplings make an excellent starter that won’t overshadow your main dish. Consider serving a light soup such as egg drop or hot and sour soup before presenting your sweet and sour chicken for a restaurant-quality multi-course meal.
Beverage pairings enhance the overall dining experience. Jasmine tea cuts through the richness of the dish while complementing its Asian flavors. For a more celebratory meal serve with a semi-dry Riesling or Gewürztraminer wine which stand up nicely to the bold sweet and sour profile without overwhelming it.
Present your sweet and sour chicken in shallow bowls rather than flat plates to contain the sauce properly. Garnish with additional sliced green onions sprinkled diagonally across the top and a light dusting of sesame seeds for visual appeal. Fresh pineapple wedges arranged around the plate add a decorative touch that reinforces the tropical flavors in the dish.


Storage and Reheating Instructions
Refrigerating Leftovers
Store your sweet and sour chicken properly to enjoy it for days after cooking. Transfer leftover chicken and sauce to an airtight container within two hours of cooking. Separate the crispy chicken from the sauce whenever possible to prevent sogginess. Your leftovers will remain fresh in the refrigerator for up to 3-4 days when properly stored. Label the container with the date to track freshness and ensure food safety.
Freezing for Later
Sweet and sour chicken freezes remarkably well for future meals. Place completely cooled chicken pieces on a baking sheet lined with parchment paper and freeze for 1-2 hours until solid. Transfer the flash-frozen chicken to freezer-safe bags or containers to prevent freezer burn. Store the sauce separately in airtight containers or freezer bags. Your frozen sweet and sour chicken will maintain quality for up to 2-3 months when properly stored. Thaw frozen components overnight in the refrigerator before reheating for best results.
Reheating Methods
Restore the crispy texture of your sweet and sour chicken with these reheating techniques:
Oven Method (Recommended)
- Preheat your oven to 350°F (175°C)
- Place chicken pieces on a baking sheet lined with parchment paper
- Reheat for 10-15 minutes until crispy and heated through
- Warm the sauce separately in a saucepan over medium heat
- Combine just before serving
Stovetop Method
- Heat 1-2 tablespoons of oil in a non-stick skillet over medium heat
- Add chicken pieces and cook for 2-3 minutes until crispy
- Warm sauce separately and combine just before serving
Microwave Method (Quick Option)
- Place chicken on a microwave-safe plate
- Cover with a damp paper towel to retain moisture
- Heat in 30-second intervals until warmed through
- Heat sauce separately for 30-60 seconds, stirring halfway
- Note that this method won’t restore crispiness
Air Fryer Method
- Preheat air fryer to 350°F (175°C)
- Arrange chicken in a single layer in the basket
- Reheat for 3-4 minutes until crispy
- Heat sauce separately and combine after reheating
Avoid reheating the combined dish multiple times to maintain food safety and quality. Always ensure reheated chicken reaches an internal temperature of 165°F (74°C) before consuming.


Healthier Variations
Transforming classic sweet and sour chicken into a more nutritious meal doesn’t mean sacrificing flavor. You can make several modifications to reduce calories fat and sodium while maintaining the delicious taste profile that makes this dish so beloved.
Baking Instead of Frying
Skip the oil-heavy frying process by opting for an oven-baked method. Preheat your oven to 425°F (220°C) and line a baking sheet with parchment paper. Coat your chicken pieces in a mixture of whole wheat flour and cornstarch then dip in beaten egg whites instead of whole eggs. Arrange the coated chicken on the baking sheet and spray lightly with cooking oil. Bake for 15-20 minutes turning halfway through until golden and crispy. This technique reduces oil content by up to 70% while still delivering satisfying crunch.
Reducing Sugar Content
Traditional sweet and sour sauce can contain important amounts of added sugar. Create a lighter version by using natural sweeteners and reducing quantities:
- Replace white sugar with half the amount of honey or pure maple syrup
- Increase the proportion of pineapple juice to provide natural sweetness
- Add a tablespoon of unsweetened applesauce for body and sweetness
- Use more rice vinegar to maintain the tangy flavor profile
- Include a teaspoon of orange zest to enhance sweetness perception without added sugar
This modified sauce contains approximately 30% less sugar while maintaining the characteristic sweet and sour balance.
Increasing Vegetable Content
Boost the nutritional profile by incorporating more vegetables into your dish:
- Double the amount of bell peppers using multiple colors for visual appeal
- Add snow peas broccoli florets or water chestnuts for crunch and nutrients
- Include shredded carrots for natural sweetness and vitamin A
- Mix in baby spinach leaves just before serving for an iron boost
- Try cauliflower florets which absorb the sauce beautifully
These additions increase fiber vitamin and mineral content significantly while creating a more satisfying filling meal with fewer calories per serving.
Protein Alternatives
Experiment with different protein sources to create variations suited to different dietary needs:
- Extra-firm tofu pressed and cubed makes an excellent vegetarian option
- Tempeh offers a nutty flavor and substantial texture for plant-based diets
- Turkey breast provides lean protein with about 30% fewer calories than chicken
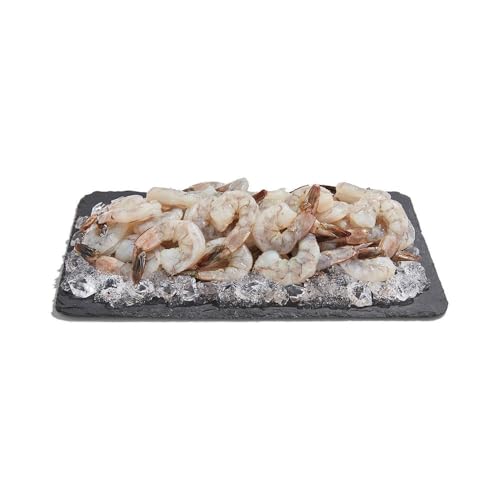
- Shrimp cooks quickly and offers heart-healthy omega-3 fatty acids
- Plant-based chicken alternatives work well for vegan versions
Whichever protein you choose coat and cook it using the same techniques adjusted for appropriate cooking times.
Grain Substitutions
Complete your healthier sweet and sour dish with smarter carbohydrate choices:
- Serve over cauliflower rice to reduce calories by approximately 150 per cup
- Choose brown rice quinoa or farro for increased fiber and nutrients
- Try shirataki noodles for an ultra-low-calorie base
- Consider a bed of steamed vegetables instead of grains
- Experiment with black rice for added antioxidants and visual interest
These modifications create a more balanced meal with improved nutritional density compared to traditional preparations. Your healthier sweet and sour chicken can become a regular part of your meal rotation without concern about excessive calories or processed ingredients.


Conclusion
You’ve now mastered the art of making restaurant-quality sweet and sour chicken at home. This dish offers the perfect balance of crispy chicken and tangy-sweet sauce that rivals any takeout version. With simple ingredients and straightforward techniques you can create this impressive meal in under 40 minutes.
Whether you stick with the classic recipe or try one of the healthier variations we’ve suggested the result will be a crowd-pleasing dish that’s both satisfying and flavorful. The double-coating method and proper frying technique ensure that perfect crispy exterior while our balanced sauce recipe hits all the right notes.
Don’t forget to prepare your ingredients ahead of time and serve immediately for the best texture contrast. Your homemade sweet and sour chicken is sure to become a regular favorite in your dinner rotation!