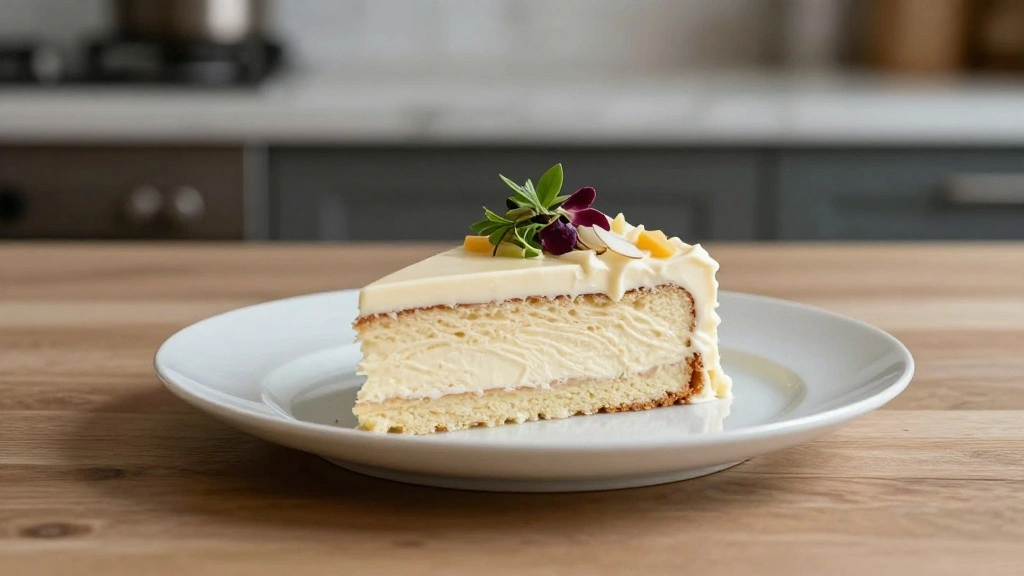
The Soft and Creamy White Chocolate Cake is a delightful combination of sweet decadence and luscious texture.
This cake brings a luxurious flavor profile, accentuated by the smoothness of white chocolate and a delicate crumb.
I first fell in love with this recipe during a winter holiday gathering, where its creamy richness provided warmth and comfort.
Perfect for any celebration, its straightforward preparation is sure to impress your guests without the fuss.
Its versatility makes it a favorite for both casual family dinners and elegant soirées.
Whether you’re a seasoned baker or a novice, this cake offers a rewarding baking experience.
The History and Cultural Significance
• Soft and Creamy traces its origins to the late 20th century in Europe, where it was originally created by pastry chefs seeking to innovate classic chocolate cakes.
• The dish evolved over decades as white chocolate became more accessible and baking techniques improved, eventually becoming the beloved version we know today.
• In many Western cultures, this dish traditionally appears at weddings and anniversaries, symbolizing purity and sweetness.
• While many variations exist across different regions, the authentic version maintains a smooth, velvety texture that sets it apart from imitations.
Recipe Overview
Nutritional Information (per serving)
Essential Equipment Guide
Stand Mixer: Essential for achieving the perfect batter consistency, a stand mixer ensures thorough mixing and aeration. Alternatives like a handheld mixer can work, but may require more time and effort. Look for models with a paddle attachment for best results.
Springform Pan: This tool is crucial for easy removal of delicate cakes without damaging them. A regular cake pan can be used, but lining it with parchment paper is recommended. Ensure the pan is leak-proof to prevent batter loss.
Double Boiler: Necessary for gently melting white chocolate without burning it, a double boiler provides even heat distribution. A heatproof bowl over a saucepan of simmering water can serve as an alternative. Make sure the bowl fits snugly over the saucepan to avoid steam escaping.
Ingredients
For the Cake Base
|
|
| Amount | Ingredient | Notes |
|---|---|---|
| 2 cups | all-purpose flour | sifted for light texture |
| 1 teaspoon | baking powder | ensures the cake rises |
| 1 cup | unsalted butter | softened, adds richness |
| 1 1/2 cups | granulated sugar | provides sweetness |
| 1 cup | white chocolate | melted, adds creaminess |
| 4 large | eggs | room temperature, provides structure |
| 1 teaspoon | vanilla extract | enhances flavor |
For the Frosting
| Amount | Ingredient | Notes |
|---|---|---|
| 1 1/2 cups | white chocolate | chopped, for melting |
| 1 cup | heavy cream | whipped, adds fluffiness |
| 1 teaspoon | vanilla extract | adds depth to flavor |
| 1 tablespoon | powdered sugar | for sweetness |
Preparation Methods
Melting Chocolate: This involves gently heating the chocolate until smooth and fluid. Using a double boiler prevents scorching. Stir constantly for even melting, and ensure no water comes into contact with the chocolate.
Creaming Butter and Sugar: This technique involves beating softened butter with sugar until light and fluffy. It's crucial for creating a tender cake crumb. Start at a low speed and gradually increase to incorporate air.
Folding: Carefully incorporating whipped cream into melted chocolate for the frosting. This preserves airiness and prevents deflation. Use a spatula and a gentle hand to fold until just combined.
Step 1: Prepare Ingredients

Begin by gathering all ingredients and ensuring they are at room temperature.
Sift the flour and baking powder together into a large mixing bowl.
Chop the white chocolate into small pieces for even melting.
Measure out all other ingredients precisely to ensure balance.
Step 2: Melt the Chocolate

Set up a double boiler by placing a heatproof bowl over a pot of simmering water.
Add the chopped white chocolate to the bowl and stir gently until fully melted.
Remove from heat and let it cool slightly while preparing the batter.
Ensure no water touches the chocolate to prevent it from seizing.
Step 3: Cream Butter and Sugar

In a stand mixer, beat the softened butter on medium speed until creamy.
Gradually add the granulated sugar, continuing to beat until light and fluffy.
Scrape down the sides of the bowl periodically to ensure even mixing.
The mixture should be pale in color, indicating proper aeration.
Step 4: Incorporate Eggs and Vanilla

Add the eggs one at a time to the butter mixture, beating well after each addition.
Pour in the vanilla extract and continue mixing until fully incorporated.
The mixture should be smooth and slightly thickened.
Avoid over-beating to prevent a dense cake.
Step 5: Combine Dry Ingredients

Gradually add the sifted flour and baking powder to the wet ingredients.
Mix on low speed until just combined, avoiding over-mixing.
Scrape down the sides of the bowl to ensure no dry pockets remain.
The batter should be smooth and homogenous.
Step 6: Incorporate Melted Chocolate

Slowly pour the melted white chocolate into the batter while mixing on low speed.
Continue to mix until the chocolate is fully incorporated.
Ensure the chocolate is not too hot to avoid scrambling the eggs.
The batter should have a uniform, creamy consistency.
Step 7: Prepare the Cake Pan

Grease a springform pan with butter or non-stick spray.
Line the bottom with parchment paper for easy removal.
Pour the batter into the prepared pan, smoothing the top with a spatula.
Tap the pan gently on the counter to remove air bubbles.
Step 8: Bake the Cake
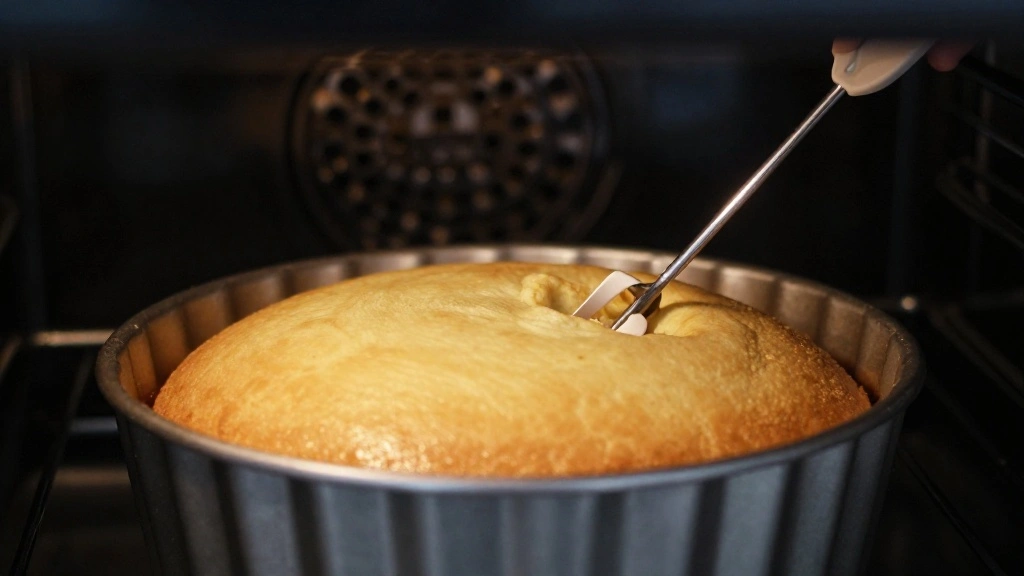
Preheat the oven to 350°F (175°C) and place the pan in the center rack.
Bake for 45 minutes or until a skewer inserted in the center comes out clean.
Check for a golden brown top and a slight springiness when pressed.
Avoid opening the oven door frequently to prevent temperature fluctuations.
Step 9: Prepare the Frosting

Melt additional white chocolate using a double boiler and cool slightly.
Whip the heavy cream with powdered sugar until soft peaks form.
Gently fold the melted chocolate into the whipped cream until smooth.
Ensure the chocolate is cool enough to avoid melting the cream.
Step 10: Assemble the Cake
Allow the baked cake to cool completely in the pan on a wire rack.
Remove the cake from the pan and peel off the parchment paper.
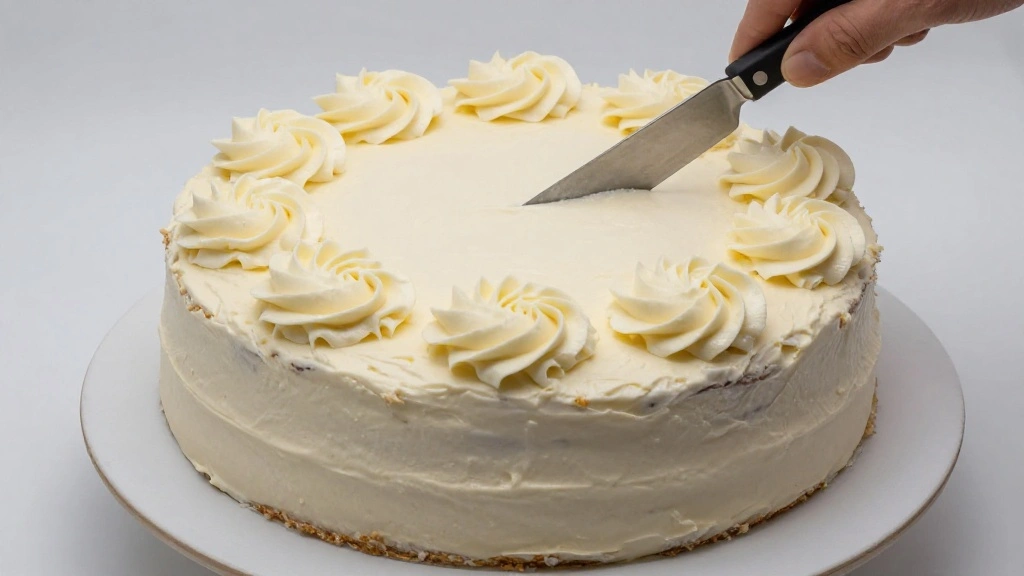
Spread the prepared frosting evenly over the top and sides of the cake.
Use a spatula to create decorative swirls or patterns if desired.
Critical Timing and Temperature Guide
Baking the Cake: Bake at 350°F (175°C) for 45 minutes. Look for a golden brown top and a clean skewer test. Avoid over-baking to prevent dryness.
Melting Chocolate: Maintain a gentle simmer in the double boiler. Chocolate should be smooth and fluid without any lumps. Avoid direct heat contact to prevent burning.
Whipping Cream: Whip until soft peaks form. Look for a stable yet soft texture. Over-whipping can lead to a grainy texture.
Pro Tips for Soft and Creamy
• Ingredient Selection: Opt for high-quality white chocolate with cocoa butter as the first ingredient for superior flavor and texture.
• Preparation Secret: Sifting dry ingredients introduces air, leading to a lighter cake texture frequently overlooked by home bakers.
• Temperature Management: Ensure all ingredients are at room temperature before mixing to promote even baking and texture.
• Texture Enhancement: Creaming the butter and sugar thoroughly introduces air, contributing to a tender crumb.
• Flavor Layering: Enhance depth by using vanilla bean paste instead of extract for a more pronounced vanilla flavor.
• Make-Ahead Strategies: Prepare the cake base a day in advance and wrap it tightly in plastic wrap. Store at room temperature for optimal freshness.
• Restaurant-Quality Finishing Touches: Garnish with white chocolate shavings or fresh berries for a visually appealing finish.
• Equipment Optimization: Use a metal spatula for frosting to achieve smooth edges and a professional look.
Troubleshooting Common Issues
• Cake Too Dense: This can result from over-mixing the batter or not creaming the butter and sugar enough. Ensure proper aeration by creaming until light and fluffy, and mix dry ingredients only until just combined.
• Chocolate Seizing: Caused by overheating or exposure to water. Melt chocolate gently over a double boiler and ensure all equipment is dry.
• Frosting Too Runny: Often due to warm chocolate being added to the cream. Ensure chocolate is cooled to room temperature before folding in.
• Uneven Baking: Results from improper oven calibration or uneven batter distribution. Rotate the cake halfway through baking and ensure batter is level in the pan.
• Cake Sticking to Pan: Avoided by properly greasing the pan and using parchment paper. Allow the cake to cool completely before attempting to remove.
• Flavor Lacking Depth: Enhanced by using high-quality vanilla and fresh ingredients. Consider adding a pinch of salt to enhance sweetness.
Variations and Regional Differences
• Italian Style: Incorporates ricotta cheese into the batter for a denser, more moist texture, and often includes a hint of lemon.
• French Variation: Uses almond flour in place of some all-purpose flour, giving it a nuttier flavor and a more delicate crumb.
• American Twist: Features a layer of raspberry jam between the cake and frosting for added tartness and contrast.
• Japanese Influence: Adds matcha powder to the frosting, offering a unique green tea flavor that complements the white chocolate.
Food Science Behind the Recipe
• The Maillard Reaction: This is responsible for the golden-brown crust on the cake, enhancing flavor through complex chemical changes between amino acids and sugars.
• Emulsification: The creaming of butter and sugar creates an emulsion, trapping air and leading to a lighter cake texture.
• Stabilization: The use of eggs provides structure and stability to the cake, helping it maintain its shape and rise properly.
Frequently Asked Questions
What's the most common mistake people make when preparing Soft and Creamy White Chocolate Cake? Over-mixing the batter, which can lead to a dense texture. Mix just until ingredients are combined.
Can I use dark chocolate instead of white chocolate? Yes, but it will alter the flavor profile significantly, creating a richer, less sweet cake.
How do I prevent my frosting from becoming grainy? Ensure the white chocolate is fully melted and cooled before incorporating into the whipped cream.
What can I do if my cake is dry? Brush the cooled cake with simple syrup before frosting to add moisture.
Is it possible to make this cake gluten-free? Yes, substitute all-purpose flour with a gluten-free flour blend suitable for baking.
How should I store leftover cake? Wrap it tightly in plastic wrap and store in the refrigerator for up to three days.
Can I freeze this cake? Yes, freeze the unfrosted cake wrapped in plastic wrap for up to two months. Thaw before frosting.
Serving and Presentation Guide
• Traditional Presentation: Serve on a large, flat cake stand with a sprinkle of white chocolate shavings and fresh berries on top.
• Modern Minimalist: Frost the cake with smooth edges and no additional decorations, allowing the cake's texture to be the focal point.
• Rustic Charm: Apply frosting with a spatula to create a rustic, swirled look, and garnish with edible flowers.
• Layered Elegance: Cut the cake into layers and add a thin layer of fruit compote between each, then frost the outside for an elegant multilayered effect.
Conclusion
With its rich, creamy texture and delicate flavor, the Soft and Creamy White Chocolate Cake is a true delight for any occasion.
Its straightforward preparation and impressive results make it a favorite among both novice and experienced bakers.
I encourage you to try this recipe and experience the joy of creating something truly special in your kitchen.