The Light and Creamy Chocolate Mousse Cake is a symphony of flavors and textures that captivates dessert lovers everywhere.
Its rich chocolate essence is perfectly balanced by a delicate, airy mousse that melts in your mouth with every bite.
I first encountered this divine dessert during a winter holiday in the French Alps, where it was a staple at every festive table.
Creating this cake at home brings that same warmth and indulgence, making it ideal for special occasions or as a sweet escape on an ordinary day.
Whether you’re a seasoned baker or a novice in the kitchen, this recipe promises a delightful experience with straightforward steps.
Get ready to impress your guests with a dessert that’s both elegant and comforting.
The History and Cultural Significance
• Light and Creamy traces its origins to France in the early 20th century, where it was originally created by French pastry chefs seeking to combine the richness of chocolate with the lightness of mousse.
• The dish evolved over decades as chefs experimented with different types of chocolate and whipping techniques, eventually becoming the beloved version we know today.
• In French culture, this dish traditionally appears at weddings and holiday celebrations, symbolizing luxury and indulgence.
• While many variations exist across different regions, the authentic version maintains an airy mousse texture that sets it apart from imitations.
Recipe Overview
Nutritional Information (per serving)
Essential Equipment Guide
Springform Pan: Essential for achieving the cake’s characteristic shape and ensuring easy removal without damaging the delicate mousse layers. Alternatives like a standard cake pan can work if lined with parchment paper, but look for a pan with a good non-stick coating.
Electric Mixer: Crucial for whipping the mousse to the perfect airy consistency. Hand mixers are a viable alternative, but stand mixers offer more consistent results. Look for a mixer with variable speed settings.
Spatula: Important for gently folding ingredients without deflating the mousse. Silicone spatulas are ideal due to their flexibility and non-stick properties.
Ingredients
For the Base
|
|
| Amount | Ingredient | Notes |
|---|---|---|
| 1 cup | graham cracker crumbs | provides a crunchy foundation |
| 2 tablespoons | sugar | adds sweetness |
| 1/4 cup | unsalted butter | melted, binds the base |
For the Mousse
| Amount | Ingredient | Notes |
|---|---|---|
| 8 ounces | dark chocolate | melted, provides rich flavor |
| 3 large | eggs | separated, adds structure |
| 1/4 cup | sugar | sweetens the mousse |
| 1 cup | heavy cream | whipped, creates light texture |
| 1 teaspoon | vanilla extract | enhances flavor |
Preparation Methods
Folding: This technique involves gently combining ingredients to maintain airiness, crucial for the mousse's texture. Use a spatula to scoop from the bottom and fold over the top, rotating the bowl slowly. Practice helps in mastering the light touch needed without deflating the mixture.
Tempering: Gradually introducing melted chocolate to whipped egg yolks prevents curdling. This is key for a smooth, creamy consistency. Slowly add small amounts of chocolate while continuously stirring for best results.
Bain-Marie: A water bath used to gently melt chocolate without burning. Place a heatproof bowl over simmering water, ensuring it doesn’t touch the water. Stir frequently until melted for a silky texture.
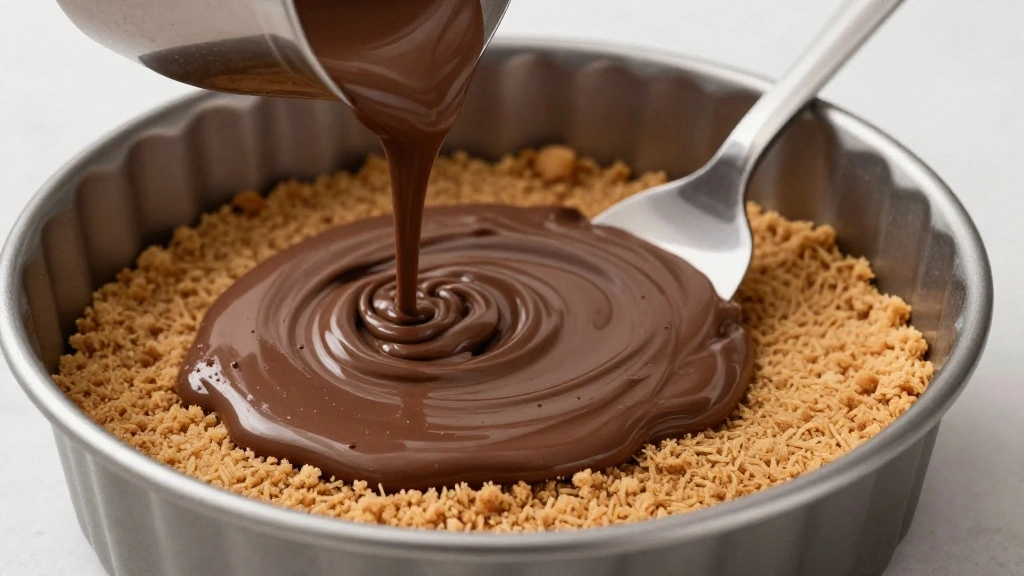
Step 1: Prepare the Base

Combine graham cracker crumbs and sugar in a bowl.
Add melted butter and mix until well combined.
Press the mixture into the bottom of a springform pan to form an even layer.
Chill in the refrigerator while preparing the mousse.
Step 2: Melt the Chocolate

Chop the dark chocolate into small pieces and place in a heatproof bowl.
Set the bowl over a pot of simmering water, ensuring the bowl does not touch the water.
Stir occasionally until the chocolate is fully melted and smooth.
Remove from heat and let cool slightly.
Step 3: Whip the Egg Yolks

Place egg yolks in a separate bowl and add half the sugar.
Use an electric mixer to whip until the mixture is pale and thick.
The yolks should have a ribbon-like consistency when the beater is lifted.
Set aside for later use.
Step 4: Whip the Egg Whites

In a clean bowl, add the egg whites and a pinch of salt.
Whisk with an electric mixer until soft peaks form.
Gradually add the remaining sugar while continuing to whip to stiff peaks.
Ensure the whites are glossy and hold their shape.
Step 5: Combine Chocolate and Yolks

Slowly pour the melted chocolate into the whipped egg yolks.
Stir gently until fully incorporated.
The mixture should be smooth and uniform in color.
Ensure the chocolate is cool enough to not cook the yolks.
Step 6: Fold in the Egg Whites
Add a third of the whipped egg whites to the chocolate mixture.
Gently fold to lighten the mixture without deflating the whites.
Add the remaining egg whites and fold until no white streaks remain.
Use a gentle lifting and folding motion for best results.
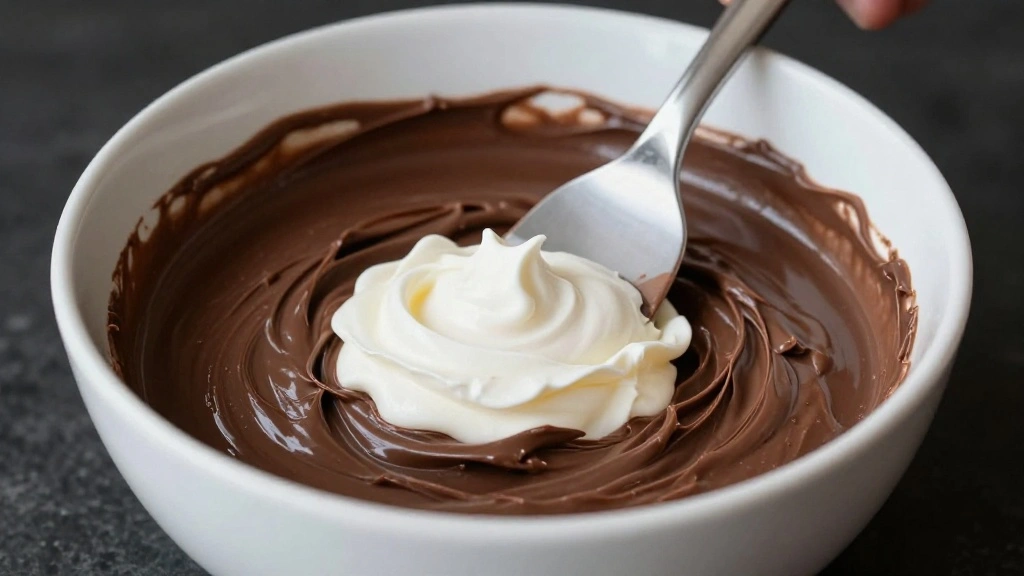
Step 7: Whip the Cream

Pour cold heavy cream into a chilled mixing bowl.
Whip with an electric mixer until soft peaks form.
The cream should hold its shape but remain smooth and creamy.
Be careful not to overwhip, as this will turn it grainy.
Step 8: Assemble the Mousse
Fold the whipped cream into the chocolate mixture.
Continue folding until fully incorporated and smooth.
Pour the mousse over the prepared base in the springform pan.
Smooth the top with a spatula and refrigerate for at least 4 hours.
Critical Timing and Temperature Guide
Melting Chocolate: Melt at a low temperature over simmering water, stirring frequently until smooth. Avoid overheating as it can seize.
Whipping Cream: Keep cream cold for optimal whipping. Stop at soft peaks to prevent overwhipping, which leads to a grainy texture.
Chilling the Cake: Chill the assembled cake for at least 4 hours to allow the mousse to set. Overnight chilling is ideal for best results.
Pro Tips for Light and Creamy
• Ingredient Selection: Choose high-quality dark chocolate with at least 70% cocoa for a rich flavor that shines through in the mousse.
• Preparation Secret: Chilling the bowl and beaters before whipping cream ensures a more stable whip that holds its shape better.
• Temperature Management: Always cool melted chocolate before combining with eggs to prevent curdling.
• Texture Enhancement: Folding technique is crucial; take time to gently fold ingredients to maintain airiness.
• Flavor Layering: Add a pinch of espresso powder to the chocolate for depth of flavor without overpowering sweetness.
• Make-Ahead Strategies: The base can be prepared a day in advance and stored in the fridge, simplifying day-of assembly.
• Restaurant-Quality Finishing Touches: Dust the top with cocoa powder or powdered sugar and garnish with fresh berries for a professional look.
• Equipment Optimization: If using a hand mixer, mix on low to medium speed to avoid overmixing and deflating the mousse.
Troubleshooting Common Issues
• Mousse Too Dense: This is often due to overmixing or not properly folding ingredients. Pay careful attention to folding technique and mix gently.
• Chocolate Seizes: Overheating or introducing water can cause this. Melt slowly over a low heat and ensure no water contacts the chocolate.
• Cream Won't Whip: Ensure cream is cold and bowl is chilled. Warm cream doesn't whip well and can become soupy.
• Base Falls Apart: This usually happens if the butter wasn't well incorporated. Ensure the mixture is evenly mixed and pressed firmly.
• Mousse Doesn't Set: Insufficient chilling time is a common cause. Allow at least 4 hours in the fridge for proper setting.
• Egg Whites Won't Stiffen: Ensure no yolk is mixed with whites and that the bowl is completely clean and dry.
Variations and Regional Differences
• Italian Variation: Incorporates a touch of amaretto liqueur for an almond flavor twist, often served during festive gatherings.
• American Style: Uses a brownie base instead of graham crackers, offering a denser, richer foundation.
• Mexican Influence: Adds a hint of cinnamon and chili powder to the chocolate for a spicy kick, reflecting local flavor preferences.
• Vegan Adaptation: Replaces eggs and cream with aquafaba and coconut cream, providing a plant-based alternative without sacrificing texture.
Food Science Behind the Recipe
• Emulsification: The process of combining chocolate with egg yolks creates a stable emulsion, ensuring a smooth and creamy texture.
• Protein Coagulation: Whipping cream and egg whites incorporates air, which is stabilized by protein coagulation during chilling, giving the mousse its lightness.
• Fat Crystallization: The cooling process allows cocoa butter in the chocolate to crystallize, contributing to the mousse's firm yet creamy structure.
Frequently Asked Questions
What's the most common mistake people make when preparing Light and Creamy Chocolate Mousse Cake? Overmixing the ingredients, especially during folding, leading to a dense mousse.
Can I substitute milk chocolate for dark chocolate? Yes, but it will result in a sweeter mousse with a less intense chocolate flavor.
How do I prevent the mousse from becoming grainy? Ensure all components are properly whipped and folded; avoid overwhipping cream and egg whites.
Is it necessary to use a springform pan? While not mandatory, a springform pan makes removal and presentation easier.
Can I use a different base instead of graham crackers? Yes, alternatives like crushed cookies or a sponge cake layer work well.
How long can the mousse cake be stored? It can be stored in the refrigerator for up to 3 days, covered to prevent drying out.
What should I do if the mousse is too soft after refrigeration? Try refrigerating longer; if still soft, it may indicate underwhipping or insufficient chocolate.
Serving and Presentation Guide
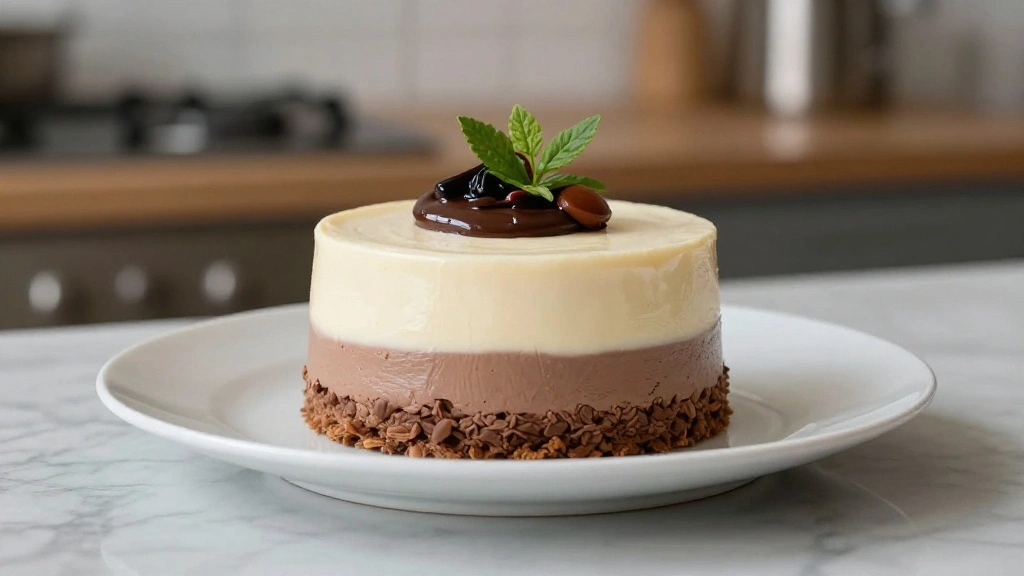
• Traditional Presentation: Serve on a cake stand with a dusting of cocoa powder and garnished with fresh mint leaves for a classic look.
• Modern Twist: Layer with fresh berries like raspberries or strawberries for color contrast and added freshness.
• Individual Portions: Create mini mousse cakes using ramekins for personalized servings, perfect for dinner parties.
• Decorative Finish: Top with chocolate shavings or curls to enhance visual appeal and signal the chocolatey goodness within.
Conclusion
Creating the Light and Creamy Chocolate Mousse Cake is a truly rewarding experience that brings joy to both the maker and the eater.
Its rich flavors and airy texture make it a standout dessert that’s sure to impress at any gathering.
By following these detailed steps and tips, you’ll master this elegant cake and delight your loved ones with your culinary prowess.
So gather your ingredients and tools, and embark on a delicious journey that’s sure to become a cherished tradition.