
Why Make Your Own Homemade Granola
Making your own granola at home transforms an ordinary breakfast into something extraordinary while offering many benefits over store-bought varieties. The control you gain over ingredients allows you to create a breakfast that perfectly suits your dietary needs and taste preferences.
Store-bought granolas often contain excessive amounts of added sugars hidden under various names. Many commercial brands pack 12-15 grams of sugar per serving which is nearly a third of the recommended daily intake. Your homemade version can use natural sweeteners like honey or maple syrup in measured amounts.
The cost savings are substantial when you prepare granola in your kitchen. Commercial organic granolas typically cost $6-9 per pound while homemade versions average just $2-3 per pound using quality ingredients. This represents a 60-70% savings on your breakfast budget.
Freshness stands as another compelling reason to make your own. Without commercial preservatives your granola delivers superior flavor and texture that store versions simply cannot match. The aroma of freshly baked granola filling your kitchen offers an experience no packaged product can replicate.
Customization possibilities become endless when you control the recipe. You can adjust ingredients based on:
- Dietary restrictions (gluten-free oats nuts or seeds)
- Seasonal availability of fruits and nuts
- Flavor preferences (more cinnamon less sweetener)
- Nutritional goals (higher protein lower carb)
Homemade granola also makes thoughtful gifts for friends and family. Package your creation in mason jars with personalized labels for birthdays holidays or hostess gifts that show genuine care and consideration.
What Makes This Homemade Granola Recipe Special
This homemade granola recipe stands apart from others thanks to its perfect balance of wholesome ingredients and irresistible flavor. The combination of old-fashioned oats and a variety of nuts creates a hearty base with substantial protein content that keeps you satisfied throughout the morning.
Natural sweeteners like pure maple syrup and honey provide just the right amount of sweetness without the refined sugars found in commercial versions. These natural sweeteners also help create those coveted clusters that make granola so addictive.
The addition of healthy fats from coconut oil not only enhances the flavor profile but also helps achieve that perfectly crisp texture when baked. Unlike many recipes that result in burned edges or undercooked centers this method ensures even baking for consistent golden clusters.
Vanilla extract and a pinch of sea salt elevate the flavor complexity transforming simple ingredients into a gourmet breakfast experience. The salt particularly enhances the natural sweetness and brings out the nuttiness of the toasted ingredients.
Your freedom to customize is perhaps this recipe’s greatest strength. You can easily swap nuts seeds or dried fruits based on what’s available in your pantry or what flavors you’re craving. Whether you prefer a tropical version with coconut flakes and dried pineapple or a more traditional approach with almonds and dried cranberries this adaptable base recipe accommodates all preferences.
The baking technique specifically developed for this recipe ensures the granola achieves that perfect clustered texture that’s often difficult to master. By pressing the mixture firmly onto the baking sheet and allowing it to cool completely before breaking into pieces you’ll achieve those satisfying chunks that make homemade granola truly special.
Unlike store-bought options that might sit on shelves for months this homemade version delivers exceptional freshness with more vibrant flavors and aromas filling your kitchen as it bakes. The difference in taste between freshly made granola and commercial alternatives is immediately noticeable from the first spoonful.
Equipment You’ll Need
Creating this homemade granola recipe requires minimal kitchen equipment which makes it accessible for cooks of all experience levels. Gather these basic tools before starting:
- Large mixing bowl – for combining dry ingredients with wet ingredients
- Measuring cups and spoons – for accurate ingredient measurements
- Rimmed baking sheet – provides enough surface area for even cooking
- Parchment paper – prevents sticking and makes cleanup easier
- Wooden spoon or silicone spatula – for thorough mixing without damaging ingredients
- Airtight storage container – keeps your finished granola fresh for weeks
The beauty of this recipe lies in its simplicity. No special appliances or fancy gadgets are necessary to achieve perfect results. Your standard kitchen equipment works perfectly for creating crunchy golden clusters.
The rimmed baking sheet plays a particularly important role. Its raised edges prevent oats and nuts from sliding off during stirring while allowing proper air circulation for that ideal crispy texture. For larger batches consider using two medium baking sheets rather than overcrowding one large sheet.
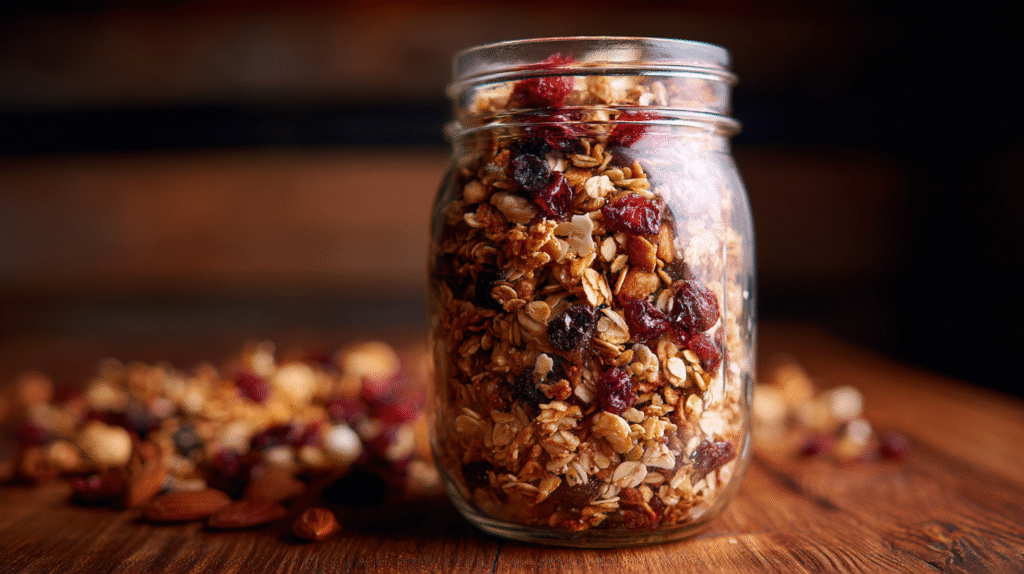
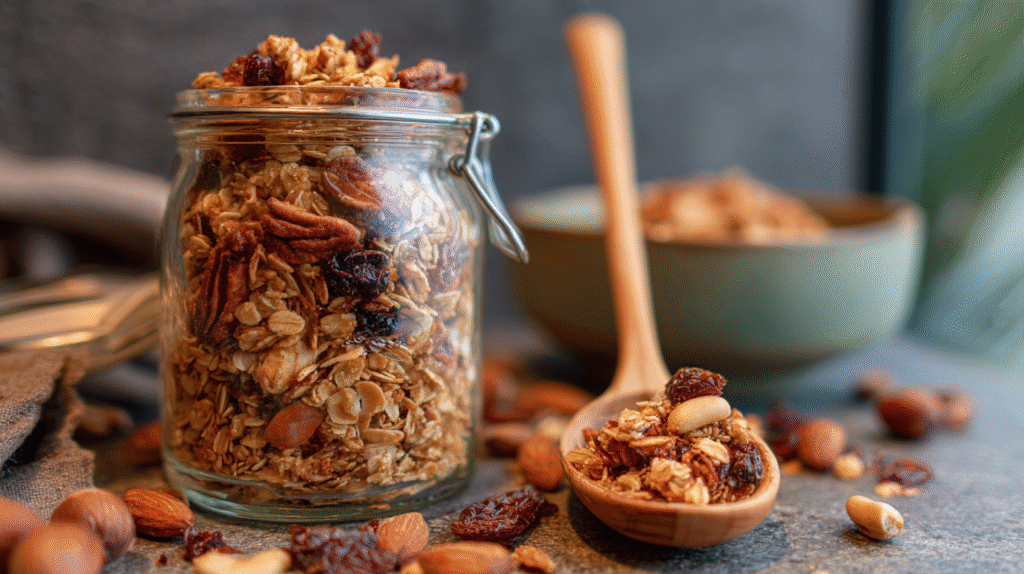
Your storage container selection matters for maintaining freshness. Glass jars with tight-fitting lids work exceptionally well by keeping moisture and air out while showcasing your beautiful homemade creation. Mason jars provide both functionality and aesthetic appeal if you plan to give some as gifts.
Ingredients For Homemade Granola
Gathering the right ingredients is the foundation of creating perfect homemade granola. This recipe uses wholesome components that work together to create those irresistible crunchy clusters while providing nutritional benefits.
Base Ingredients
- 3 cups old-fashioned rolled oats (not quick oats)
- 1 cup raw almonds, roughly chopped
- 1 cup pecans or walnuts, roughly chopped
- ½ cup unsweetened coconut flakes
- ¼ cup pepitas (pumpkin seeds)
- ¼ cup sunflower seeds
- 2 tablespoons flaxseed or chia seeds
- ¼ teaspoon salt (preferably sea salt)
Sweeteners And Flavorings
- ⅓ cup pure maple syrup
- ¼ cup honey (or substitute with additional maple syrup for vegan option)
- ⅓ cup coconut oil, melted
- 1 teaspoon vanilla extract
- 1 teaspoon ground cinnamon
- ¼ teaspoon ground nutmeg (optional)
Mix-Ins
- ¾ cup dried cranberries
- ½ cup raisins or golden raisins
- ½ cup dried apricots, chopped
- ⅓ cup dried cherries
- ¼ cup crystallized ginger, finely chopped (optional)
- ¼ cup dark chocolate chips (add after baking and cooling)
- ¼ cup dried banana chips (add after baking)
You should add dried fruits and chocolate only after baking your granola to prevent burning. Feel free to substitute any nuts or fruits based on your preferences or dietary needs. The beauty of homemade granola lies in its adaptability—swap in seasonal fruits or experiment with different spice combinations to create your signature blend.
How To Make Homemade Granola
Creating perfect homemade granola is surprisingly simple when you follow these step-by-step instructions. The process breaks down into four easy stages that will transform basic ingredients into delicious crunchy clusters.
Preparing The Dry Ingredients
Start by preheating your oven to 325°F (165°C) and lining a large rimmed baking sheet with parchment paper. In your large mixing bowl combine 3 cups of old-fashioned rolled oats with 1 cup of raw nuts or seeds of your choice. Add ½ cup unsweetened coconut flakes and ½ teaspoon sea salt to enhance the flavor profile. You can customize this base mixture by incorporating different nuts like almonds pecans or walnuts based on your preference. Ensure all dry ingredients are evenly distributed throughout the mixture by stirring thoroughly with your wooden spoon or silicone spatula.
Mixing The Wet Ingredients
In a separate smaller bowl whisk together ⅓ cup melted coconut oil ½ cup pure maple syrup or honey and 1 teaspoon vanilla extract. Pour this liquid mixture over your prepared dry ingredients. The wet ingredients act as the binding agents that will create those desirable clusters when baked. Use your spatula to thoroughly coat every bit of the dry mixture ensuring nothing remains dry at the bottom of the bowl. This even distribution of moisture is crucial for achieving consistent texture and flavor throughout your granola.
Baking Process
Transfer your coated mixture onto the prepared baking sheet spreading it in an even layer about ¼-inch thick. Avoid overcrowding which can lead to uneven baking and steaming rather than crisping. Place the baking sheet in the preheated oven and bake for 20-25 minutes until the granola turns a beautiful golden brown. The key technique for achieving chunky clusters is to avoid stirring during baking. Halfway through the baking time rotate the pan for even browning but resist the temptation to mix the granola. Once baked remove from the oven and allow the granola to cool completely on the baking sheet without disturbing it. This cooling period is essential as it allows the granola to crisp up and form those satisfying clusters.
Adding The Mix-Ins
After your granola has completely cooled it’s time to add the mix-ins. Gently break the granola into your desired cluster size using your hands or a spatula. Add ½ cup of dried fruits such as cranberries raisins or chopped apricots. Mix-ins like chocolate chips mini M&Ms or candied ginger should be incorporated at this stage rather than before baking to prevent melting or burning. Toss everything together carefully to maintain the clusters you’ve worked to achieve. Your homemade granola can now be transferred to an airtight container where it will stay fresh for up to two weeks at room temperature or longer when refrigerated. The flavors actually continue to develop and meld together over the first day or two making this recipe perfect for advance preparation.
Customization Options
One of the greatest advantages of homemade granola is its adaptability to different dietary needs and taste preferences. These variations will help you create a version that works perfectly for your exact requirements while maintaining the delicious flavor and satisfying crunch.
Nut-Free Variation
Creating a nut-free granola is simple and just as delicious as the traditional version. Replace all nuts with a combination of additional seeds like pumpkin seeds sunflower seeds flax seeds and hemp hearts to maintain protein content and crunchy texture. Boost the volume with extra coconut flakes or add crispy rice cereal for a light airy quality. Seeds provide similar nutritional benefits to nuts including healthy fats protein and fiber making them excellent substitutes. Your nut-free granola will have a slightly different flavor profile but the toasty golden clusters will still deliver that satisfying crunch you crave with breakfast.
Gluten-Free Option
Standard oats are naturally gluten free but cross contamination during processing can be an issue for those with celiac disease or gluten sensitivity. Purchase certified gluten-free rolled oats which are processed in dedicated facilities to eliminate any risk of cross contamination. Verify that all other ingredients including vanilla extract spices and dried fruits are also certified gluten free as some may contain hidden gluten or be processed on shared equipment. Many commercial granolas contain barley malt or other gluten containing ingredients but your homemade version allows complete control over every component ensuring a truly gluten-free breakfast option.
Low-Sugar Alternative
Reducing sugar without sacrificing flavor is entirely possible with some thoughtful substitutions. Cut the maple syrup and honey quantities by half and supplement with unsweetened applesauce which adds natural sweetness and helps maintain moisture for proper clustering. Use spices like cinnamon nutmeg and cardamom more generously as they enhance perceived sweetness without adding any sugar. Fresh fruit purees such as mashed banana or pear can replace some liquid sweeteners while adding subtle fruit flavors. Avoid sweetened dried fruits and instead choose naturally sweet options like dates or figs in smaller amounts. Your low-sugar granola might require slightly longer baking time to achieve the same crispness but will offer a more subtle natural sweetness that allows the flavors of nuts seeds and spices to shine through.
Storing Your Homemade Granola
Proper storage is crucial for maintaining the freshness and crunch of your homemade granola. Once your granola has completely cooled after baking, transfer it to an airtight container to preserve its texture and flavor. Glass mason jars with tight-fitting lids work exceptionally well as they prevent moisture from entering and keep the granola crisp for longer periods.
Store your container in a cool, dry place away from direct sunlight to extend shelf life. At room temperature, properly stored homemade granola typically remains fresh for up to 2 weeks. You’ll notice the flavors actually continue to develop and meld together during the first few days after baking.
For longer storage options, consider freezing your granola in freezer-safe containers or resealable bags for up to 3 months. Freezing doesn’t affect the texture significantly, and you can enjoy small portions directly from the freezer without thawing.
When storing granola with dried fruits, remember that they can sometimes absorb moisture from the environment and become sticky. If you live in a particularly humid climate, you might want to store dried fruits separately and mix them in just before serving.
Portion-sized containers offer a convenient way to prepare grab-and-go breakfasts or snacks for the week. Small mason jars or reusable food containers filled with single servings of granola make weekday mornings easier and help control portion sizes.
Watch for signs that your granola is past its prime, such as a stale smell, softened texture, or rancid flavor from the nuts. Trust your senses—if it doesn’t smell or taste right, it’s best to make a fresh batch rather than risk consuming spoiled food.
Serving Suggestions
Transform your homemade granola from a simple breakfast staple into versatile culinary experiences with these serving ideas. Your golden clusters can enhance many dishes throughout the day while providing sustained energy and nutritional benefits.
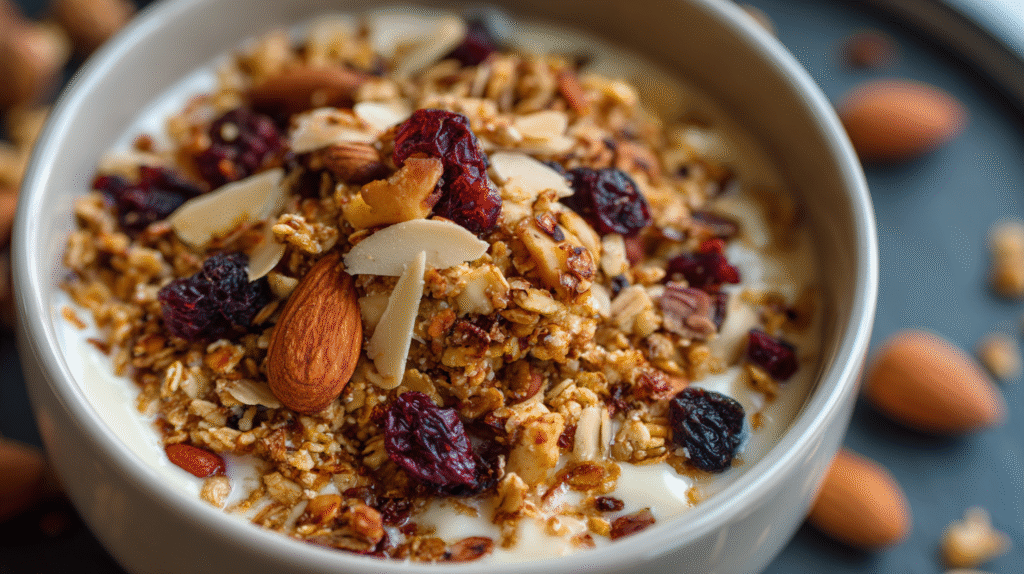
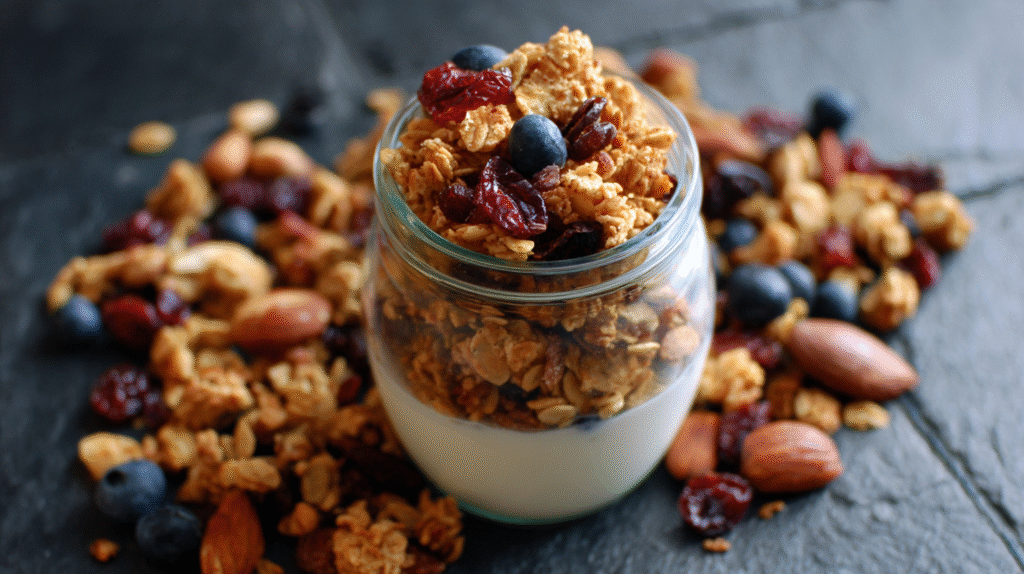
Classic yogurt parfaits become extraordinary when layered with your crunchy homemade granola fresh berries and a drizzle of honey. The contrasting textures create a satisfying breakfast or snack that balances protein-rich yogurt with fiber-packed granola clusters.
Sprinkle a handful over smoothie bowls to add essential texture and visual appeal to these nutrient-dense meals. The crunch factor elevates creamy smoothie bases made with acai mangoes or mixed berries creating an Instagram-worthy breakfast option.
Top your morning oatmeal with a generous scattering of granola during the last few minutes of cooking. This unexpected pairing adds delightful textural contrast to warm porridge especially when combined with sliced bananas and a splash of milk.
Create stunning breakfast bowls by using your homemade granola as a base then topping with seasonal fruits nut butters and a touch of maple syrup. These customizable bowls make excellent meal prep options for busy weekday mornings.
Granola milk emerges as a delicious treat when you steep your homemade clusters in cold milk for 5-10 minutes before straining. The resulting flavored milk captures the essence of your granola spices and sweeteners making a wonderful accompaniment to cookies or brownies.
Incorporate your granola into baked goods by folding it into muffin batters cookie doughs or quick bread recipes. The clusters maintain their crunch and introduce pockets of sweetness and texture throughout your baked treats.
Create a quick dessert by layering your granola with whipped cream and macerated berries in elegant glasses. This deconstructed crumble provides the satisfaction of a traditional fruit crisp with minimal preparation time.
Press your homemade granola into bars using honey or nut butter as a binding agent for convenient on-the-go snacks. These portable energy boosters deliver sustained fuel for hikes workouts or busy afternoons away from home.
Serve your granola as an ice cream topping for an elevated dessert experience that combines cold creamy sweetness with warm spiced crunch. The contrast in temperatures and textures creates a memorable ending to any meal.
Blend your granola into a fine crumb mixture using a food processor then use as a nutritious alternative to graham cracker crusts for cheesecakes and tarts. The natural oils and sweeteners in your granola help bind the crust while adding complex flavors.
Nutritional Benefits
Homemade granola stands out as a nutrient powerhouse compared to most commercial breakfast options. Each ingredient contributes exact health benefits that support your overall wellbeing while satisfying hunger and taste preferences.
Whole Grains for Sustained Energy
Old-fashioned rolled oats form the foundation of this granola recipe and provide complex carbohydrates that release energy slowly throughout your morning. These whole grains contain beta-glucan fiber which helps maintain healthy cholesterol levels and improves digestive health. A single serving of this granola delivers approximately 4-5 grams of dietary fiber which represents about 15-20% of your daily recommended intake.
Protein-Rich Nuts and Seeds
The combination of almonds walnuts and seeds in this recipe creates a protein profile that supports muscle maintenance and satiety. These ingredients provide plant-based complete proteins containing essential amino acids your body cannot produce on its own. A half-cup serving of this homemade granola contains roughly 6-8 grams of protein depending on your exact nut selection.
Heart-Healthy Fats
Coconut oil and nuts provide beneficial monounsaturated and polyunsaturated fats that support cardiovascular health. These healthy fats aid in the absorption of fat-soluble vitamins (A D E and K) present in other foods you might pair with your granola. Unlike many commercial granolas that use hydrogenated oils this recipe uses only natural fats that contribute to brain health and hormone production.
Essential Vitamins and Minerals
This granola recipe serves as an excellent source of essential micronutrients that support various bodily functions:
- Vitamin E from almonds and sunflower seeds acts as an antioxidant
- Magnesium from nuts and oats supports over 300 enzymatic reactions in your body
- Zinc from pumpkin seeds boosts immune function
- Iron from oats helps transport oxygen throughout your bloodstream
- B vitamins from whole grains support energy metabolism
Natural Sweeteners with Lower Glycemic Impact
Unlike commercial granolas that often contain refined sugars this recipe uses natural sweeteners like maple syrup and honey. These alternatives provide small amounts of minerals and antioxidants while having a lower glycemic impact when combined with the fiber and protein in the recipe. This composition helps prevent blood sugar spikes that can lead to energy crashes later in the morning.
Antioxidant Properties
The cinnamon vanilla and various nuts in this recipe contain compounds with antioxidant properties that help combat oxidative stress in your body. These ingredients work together to reduce inflammation and support cellular health. Studies show that cinnamon particularly helps regulate blood sugar levels making this granola especially beneficial for balanced energy throughout your day.
| Nutrient | Amount per 1/2 cup serving | % Daily Value |
|---|---|---|
| Calories | 210-240 | – |
| Protein | 6-8g | 12-16% |
| Fiber | 4-5g | 15-20% |
| Healthy Fats | 10-12g | 15-18% |
| Iron | 2mg | 11% |
| Magnesium | 60mg | 15% |
| Vitamin E | 4mg | 20% |
This homemade granola recipe transforms your breakfast into a nutritional cornerstone that supports both immediate energy needs and long-term health goals without artificial additives or excessive sugars found in many commercial alternatives.
Make-Ahead Tips
Homemade granola is the perfect candidate for batch preparation saving you valuable time throughout your busy week. Prepare a double or triple batch on weekends when you have more time to spend in the kitchen. Cooling the granola completely before storage is crucial for maintaining that satisfying crunch you worked so hard to achieve.
For optimal results store your prepared granola in individual portion-sized containers creating grab-and-go breakfast options that streamline hectic mornings. Mason jars work exceptionally well for this purpose providing both functionality and visual appeal. Consider labeling each container with the date to track freshness and ensure you’re enjoying your granola at its peak quality.
Customize different batches with varied mix-ins to prevent breakfast boredom. One batch might feature dried cranberries and white chocolate while another incorporates tropical dried fruits like mango and pineapple. This strategy gives you multiple flavor profiles to enjoy throughout the week without additional preparation time.
Pre-portion your favorite accompaniments alongside your granola for complete breakfast meal prep. Small containers of yogurt dried fruits or fresh berries can be refrigerated next to your granola jars creating complete breakfast kits that require zero morning thought. This system works particularly well for family members who need to eat at different times or take breakfast on the go.
Remember that granola flavors continue to develop and intensify over the first 48 hours after baking making this recipe ideal for advance preparation. The maple and vanilla notes become more pronounced and the clusters achieve their perfect texture after this resting period. Planning your granola-making session 1-2 days before you intend to start enjoying it yields the most flavorful results.
The Perfect Homemade Granola Gift
Homemade granola makes an exceptional gift that stands out from typical store-bought options. Your friends and family will appreciate the thoughtfulness behind a jar of handcrafted granola with its perfect balance of crunchy clusters and personalized flavors. Sharing this nutritious treat shows care for your loved ones’ wellbeing while providing them with a versatile breakfast option they can enjoy for days.
Transform your homemade granola into an impressive gift with these simple presentation ideas:
- Mason jars or clear glass containers showcase the beautiful layers and textures
- Decorative ribbon tied around the jar neck adds a festive touch
- Custom tags listing ingredients and serving suggestions provide helpful information
- Wooden scoops attached to larger containers make serving convenient
- Reusable fabric covers secured with twine create an eco-friendly presentation
For special occasions like holidays or housewarmings, consider creating themed gift baskets. Pair your granola with local honey, artisanal yogurt, fresh berries, or a beautiful breakfast bowl for a complete morning ritual package. Seasonal variations with pumpkin spice for fall or dried strawberries for spring can make your gift especially timely and thoughtful.
Personalization makes your granola gift truly special. Tailor the ingredients to match the recipient’s preferences or dietary needs. Someone following a gluten-free diet will appreciate granola made with certified gluten-free oats, while friends with a sweet tooth might enjoy a version with dark chocolate chunks and coconut flakes.
When packaging your granola gifts, include a small card with the following information:
- Storage instructions (airtight container, cool place)
- Shelf life details (1-2 weeks at room temperature)
- Serving suggestions (over yogurt, with milk, as a snack)
- The basic recipe, encouraging them to make their own
Many recipients report that homemade granola gifts inspire them to start making their own breakfast foods, creating a ripple effect of healthier eating habits. Your thoughtful gift not only provides immediate enjoyment but potentially sparks a lasting positive change in their kitchen routines.
The cost effectiveness of granola gifts makes them perfect for occasions when you need multiple presents. A single large batch can fill 6-8 medium jars, with each gift costing approximately $3-4 in ingredients and packaging. This affordable yet premium gift option delivers maximum impact without straining your budget.
Conclusion
Making your own granola is a game-changer for your breakfast routine. It’s not just about saving money or avoiding preservatives—it’s about creating something truly delicious that fits your exact preferences.
With just a few basic kitchen tools and wholesome ingredients you likely already have on hand you’ll create golden clusters that outshine any store-bought version. The recipe’s flexibility means it can evolve with your tastes and dietary needs over time.
Whether enjoyed with yogurt eaten by the handful or gifted to someone special your homemade granola represents a small but meaningful step toward healthier more intentional eating habits. Give this recipe a try and you’ll wonder why you ever settled for anything less than homemade.