
The Perfect Homemade Butterscotch Pudding
Creating the perfect butterscotch pudding from scratch is easier than you might think. This classic dessert relies on simple techniques that yield incredible results when executed properly. Follow these steps to achieve silky smooth pudding with that signature rich butterscotch flavor.
Preparing Your Ingredients
Before you begin cooking, gather and prepare all your ingredients:
- 4 tablespoons unsalted butter
- 1 cup dark brown sugar (packed)
- 3 cups whole milk (divided)
- ¼ cup cornstarch
- ¼ teaspoon salt
- 4 large egg yolks
- 2 teaspoons pure vanilla extract
- 1 tablespoon bourbon (optional)
Having everything measured and ready will make the cooking process much smoother since timing is crucial when making pudding.
Creating the Butterscotch Base
The foundation of great butterscotch pudding lies in properly caramelizing the butter and brown sugar:
- Melt the butter in a medium heavy-bottomed saucepan over medium heat
- Add the brown sugar and stir until completely combined
- Cook for about 4-5 minutes until the mixture bubbles and develops a deep amber color
- Gradually whisk in 2½ cups of milk (reserving ½ cup for later)
- Continue cooking until steam rises from the surface
This process develops those complex caramel notes that distinguish true butterscotch from simple vanilla pudding.
Thickening the Pudding
The cornstarch slurry is what transforms your liquid base into a proper pudding:
- In a separate bowl whisk together cornstarch salt and the remaining ½ cup milk until smooth
- Slowly pour this mixture into your hot butterscotch base while whisking constantly
- Continue cooking and stirring until the pudding thickens enough to coat the back of a spoon (about 2-3 minutes)
- Reduce heat to low to prevent scorching
Tempering the Eggs
Adding egg yolks gives butterscotch pudding its luxurious texture but requires a technique called tempering:
- Whisk the egg yolks in a medium bowl until smooth
- Slowly add about 1 cup of the hot pudding mixture to the yolks while whisking vigorously
- Pour the tempered egg mixture back into the saucepan while continuing to whisk
- Cook for an additional 1-2 minutes until the pudding is thick and glossy
This method prevents the eggs from scrambling when they come in contact with the hot liquid.
Finishing Touches
The final steps ensure your pudding achieves perfection:
- Remove from heat and stir in vanilla extract and bourbon (if using)
- Strain through a fine-mesh sieve to remove any lumps
- Pour into individual serving dishes or a large bowl
- Press plastic wrap directly onto the surface to prevent skin formation
- Chill for at least 2 hours or enjoy warm
Why This Butterscotch Pudding Recipe Works
This butterscotch pudding recipe stands out from others for several compelling reasons. Real butterscotch flavor comes from the perfect combination of deeply caramelized brown sugar and butter which this recipe prioritizes. Unlike store-bought versions that rely on artificial flavors this homemade pudding develops authentic rich notes through proper cooking techniques.
The careful balance of ingredients ensures a silky smooth texture that’s neither too firm nor too loose. Tempering the egg yolks properly prevents curdling while adding that signature luxurious mouthfeel that distinguishes exceptional puddings from mediocre ones.
Cornstarch provides reliable thickening without the graininess that can plague some flour-based puddings. Your pudding sets beautifully without becoming rubbery which is a common issue in less well-developed recipes.
This recipe offers both accessibility and impressive results even for novice cooks. Most ingredients are pantry staples you likely already have on hand making this an easy dessert to prepare on a whim. Total active cooking time stays under 20 minutes even though the made-from-scratch approach.
Versatility remains another strength of this particular recipe. You can serve it warm for a comforting treat or chilled for a refreshing dessert. The optional bourbon addition allows you to customize the flavor profile to suit adult palates while keeping it family-friendly when needed.
The straining step eliminates any potential lumps ensuring a consistently perfect texture every time. This technique guarantees professional-quality results regardless of your previous pudding-making experience.
Ingredients You’ll Need
Gather these simple ingredients to create a rich and silky butterscotch pudding that surpasses any store-bought version. Most items are likely already in your pantry.
For the Pudding Base
- 4 tablespoons unsalted butter
- 1 cup dark brown sugar (packed)
- 3 cups whole milk (divided)
- 1/4 teaspoon salt
- 5 large egg yolks
- 1/4 cup cornstarch
- 2 teaspoons pure vanilla extract
- 1 tablespoon bourbon (optional for extra flavor depth)
For the Topping (Optional)
- 1 cup heavy whipping cream
- 2 tablespoons powdered sugar
- 1/2 teaspoon vanilla extract
- Butterscotch chips or crushed toffee pieces for garnish
- Pinch of flaky sea salt
Kitchen Tools Required
To prepare this rich and velvety butterscotch pudding recipe you’ll need several essential kitchen tools that ensure smooth execution. Gathering these items before you begin will make the cooking process more efficient and enjoyable.
- Medium saucepan – Preferably heavy-bottomed for even heat distribution when caramelizing the butter and brown sugar
- Whisk – A sturdy whisk helps incorporate ingredients and prevent lumps from forming
- Rubber spatula – For scraping down the sides of your pan and ensuring nothing burns
- Measuring cups and spoons – For accurate ingredient measurements
- Medium mixing bowl – Used for tempering the egg yolks
- Fine mesh strainer – Essential for achieving that silky smooth texture by removing any potential lumps
- Serving dishes – Individual ramekins or dessert cups work perfectly
- Kitchen thermometer – Optional but helpful for monitoring the temperature of your mixture
- Small bowl – For creating your cornstarch slurry
- Plastic wrap – To prevent skin from forming on the pudding while chilling
The most important tools for this recipe are the heavy-bottomed saucepan and fine mesh strainer. The quality saucepan prevents scorching of the delicate butterscotch mixture while the strainer ensures your pudding achieves that perfect restaurant-quality smoothness every time.
The Secret to Rich Butterscotch Flavor
True butterscotch flavor emerges from the perfect marriage of brown sugar and butter caramelized together until they reach a deep amber hue. This critical cooking process releases complex flavor compounds that simply cannot be replicated with artificial flavorings or shortcuts. Many home cooks rush this step which results in a pale imitation of authentic butterscotch.
The transformation begins when butter and brown sugar meld under gentle heat creating a chemical reaction called the Maillard reaction. This scientific process produces hundreds of new flavor compounds that give butterscotch its distinctive rich caramel notes with subtle hints of toffee. Let this mixture bubble for at least 3-5 minutes until it darkens significantly and releases a nutty aroma.
Salt plays an essential yet often overlooked role in developing authentic butterscotch flavor. A generous pinch enhances the caramel notes while cutting through the sweetness to create a perfectly balanced dessert. Premium flaky sea salt works best as it dissolves gradually throughout the cooking process.
Dark brown sugar delivers superior results compared to light varieties thanks to its higher molasses content. These additional molasses compounds contribute depth and complexity that elevate your pudding from good to exceptional. Muscovado sugar takes this richness even further if you can source it for your recipe.
Temperature control remains crucial throughout the caramelization process. Too hot and your butterscotch turns bitter; too cool and you’ll never develop those complex flavor notes. Medium-low heat provides the sweet spot allowing sugars to caramelize properly without burning. Watch for visual cues like bubbling that becomes slightly slower and more viscous as the mixture develops.
Timing your additions matters tremendously for flavor development. Adding dairy too early prevents proper caramelization while waiting too long risks burning the sugar. Allow the butter-sugar mixture to fully caramelize before slowly incorporating milk which will immediately halt the browning process and capture that perfect flavor stage.
Instructions
Follow these steps to create the perfect butterscotch pudding from scratch. This foolproof method ensures a silky smooth dessert with authentic caramel flavor.
Preparing Your Workspace
Before you begin cooking gather all ingredients and measure them out completely. Place your measured ingredients in small bowls within easy reach of your stove. Set out all necessary equipment including your saucepan whisk rubber spatula measuring cups and bowls. Fill a large bowl with ice water and set aside if planning to quick-chill your pudding. Line up serving dishes or a storage container on your counter so they’re ready when the hot pudding is finished. This preparation step saves time and prevents the possibility of burning your butterscotch while searching for ingredients.
Making the Butterscotch Base
Melt the butter in your heavy-bottomed saucepan over medium heat until it foams. Add the dark brown sugar and stir constantly with your wooden spoon or heat-resistant spatula until the mixture looks like wet sand about 2-3 minutes. Continue cooking until the sugar mixture darkens slightly and gives off a nutty caramel aroma about 4-5 minutes total. Take care not to burn the mixture as this will create bitter flavors. Pour in half the milk slowly while whisking continuously to prevent the hot sugar from seizing. The mixture will bubble vigorously which is normal. Add the remaining milk and salt then whisk until fully incorporated.
Cooking the Pudding
In a separate bowl whisk together the egg yolks and cornstarch until smooth with no visible lumps. Temper the egg mixture by slowly pouring about 1 cup of the hot butterscotch liquid into the eggs while whisking constantly. This gradual warming prevents the eggs from scrambling. Pour the tempered egg mixture back into the saucepan with the remaining butterscotch liquid whisking continuously. Return the pan to medium heat and cook stirring constantly with a whisk until the pudding thickens enough to coat the back of a spoon about 2-3 minutes. You’ll notice the texture change from thin to thick quite suddenly. Remove from heat immediately and stir in the vanilla extract and bourbon if using.
Chilling and Setting
Pour the hot pudding through a fine-mesh strainer into a clean bowl or directly into individual serving dishes. This crucial step removes any accidental lumps or bits of cooked egg. Press a piece of plastic wrap directly onto the surface of the pudding if you want to prevent a skin from forming. Refrigerate for at least 2 hours or until completely chilled and set. For quicker cooling place your bowl of strained pudding into the prepared ice bath and stir occasionally until cooled to room temperature before refrigerating. The pudding will continue to thicken as it chills. Before serving remove the plastic wrap and top with whipped cream and additional garnishes if desired.
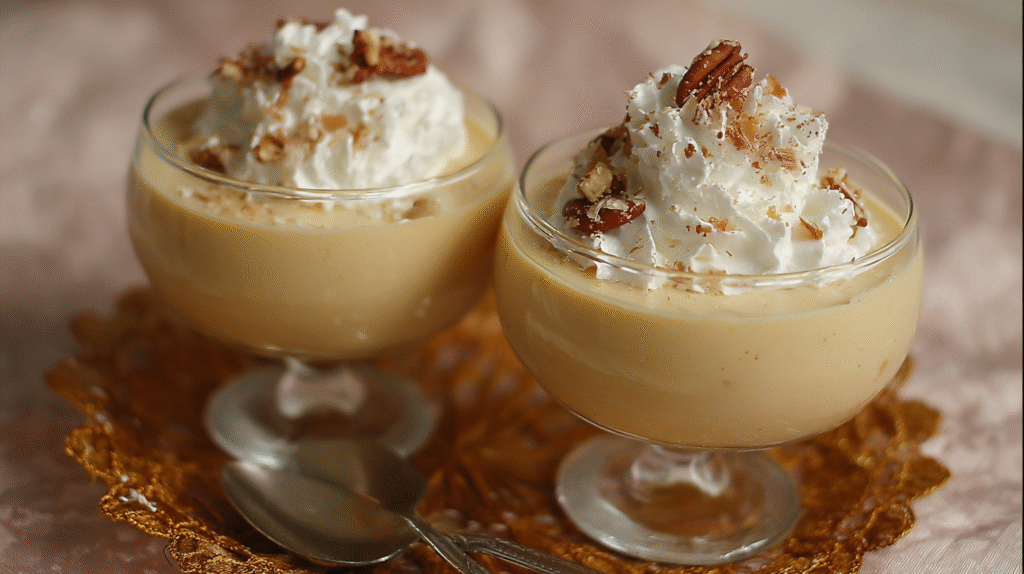
Serving Suggestions
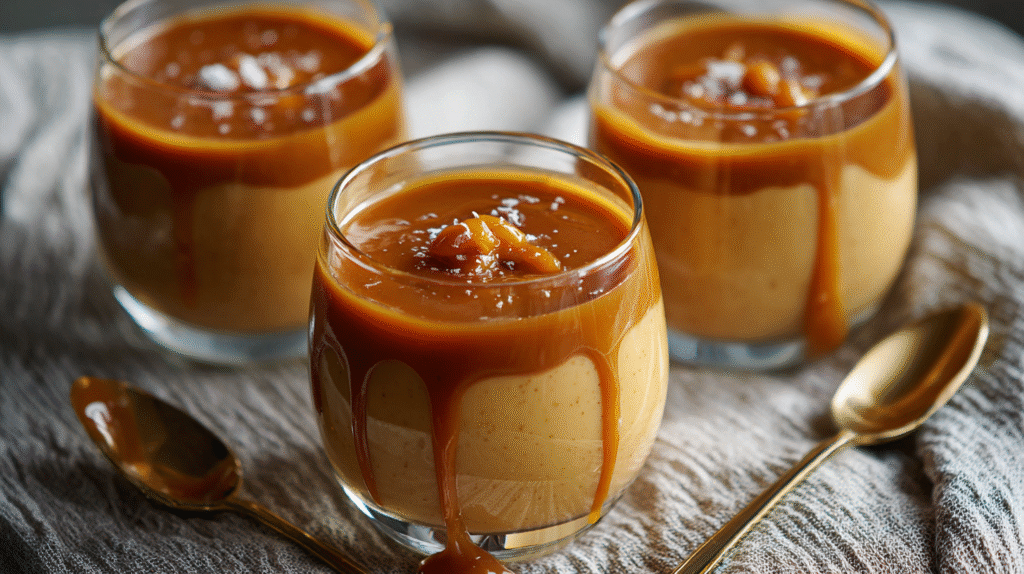
Elevate your homemade butterscotch pudding with these serving ideas that transform this classic dessert into an impressive treat. Serve it in clear glasses or ramekins to showcase the rich amber color that makes butterscotch pudding so visually appealing. Consider chilling individual portions for at least 4 hours for the best texture and flavor development.
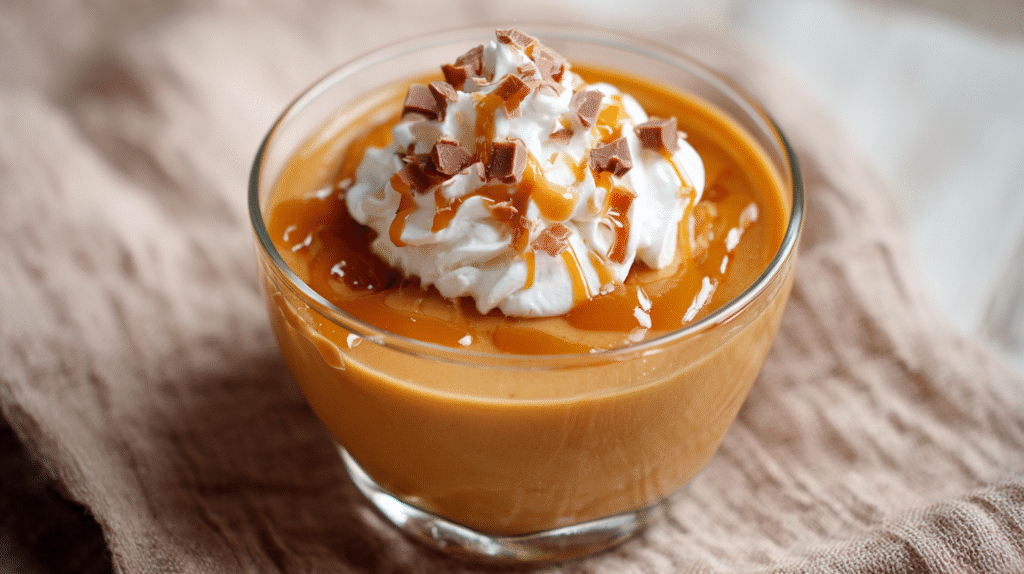
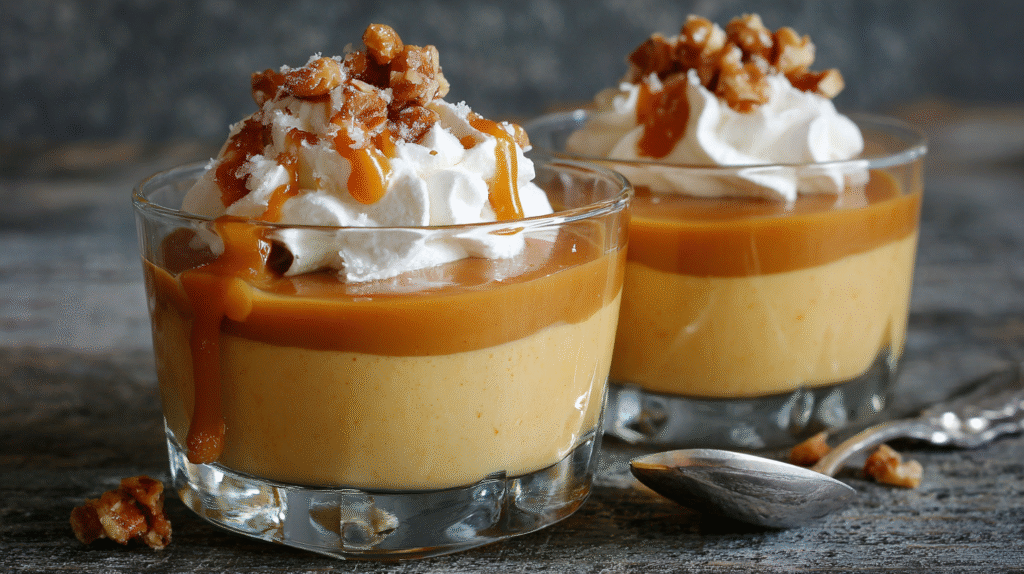
For an elegant presentation top each serving with a dollop of freshly whipped cream sprinkled with a pinch of flaky sea salt to enhance the caramel notes. Crushed toffee bits or butterscotch chips scattered over the surface add textural contrast and intensify the butterscotch flavor profile.
Create a dessert parfait by layering the pudding with crumbled shortbread cookies or graham crackers for a delightful crunch. Drizzle warm salted caramel sauce over the top just before serving to add another dimension of flavor and create an impressive visual effect.
Butterscotch pudding pairs wonderfully with fresh berries particularly raspberries or strawberries whose tartness balances the sweet richness of the pudding. Banana slices also complement the caramel notes while adding nutritional value to your dessert.
For dinner parties serve the pudding in vintage teacups or crystal dessert bowls with shortbread cookies on the side for an extra touch of sophistication. During fall and winter months warm the pudding slightly and add a sprinkle of cinnamon or nutmeg to incorporate seasonal flavors.
Transform leftover pudding into a butterscotch trifle by adding layers of cake cubes whipped cream and caramelized bananas. For a playful twist serve mini portions in shot glasses at parties garnished with tiny butterscotch candies or gold edible glitter.
This versatile dessert works equally well as a casual weeknight treat or as the finale to an elaborate dinner making it perfect for any occasion from family gatherings to holiday celebrations.
Storage Tips
Proper storage is essential for maintaining the quality of your homemade butterscotch pudding. Store leftover pudding in airtight containers to prevent it from absorbing other flavors in your refrigerator. Your pudding will stay fresh for up to 4 days when refrigerated properly at or below 40°F (4°C).
Press plastic wrap directly onto the surface of the pudding before placing the lid on your container to prevent skin formation during storage. Individual portions can be stored in small ramekins or jars for convenient single servings that are ready to grab and enjoy.
Butterscotch pudding does not freeze well due to its cornstarch base which can break down and become watery upon thawing. Room temperature storage is not recommended as dairy-based desserts should never sit out longer than 2 hours for food safety reasons.
Signs that your pudding has spoiled include separation of ingredients water pooling on the surface or any off odors. Trust your senses when determining whether stored pudding is still good to eat. The texture of properly stored pudding may become slightly firmer over time but should still maintain its creamy consistency.
For best flavor experience allow refrigerated pudding to sit at room temperature for about 10 minutes before serving. This slight warming enhances the butterscotch flavor notes that might be muted when the pudding is too cold.
Troubleshooting Common Issues
Even the most experienced home cooks encounter challenges when making butterscotch pudding. Knowing how to identify and solve these common problems will help you achieve perfect results every time.
My Pudding Is Lumpy
Lumps in butterscotch pudding typically stem from improper tempering or uneven cooking. To fix a lumpy pudding, pour it through a fine-mesh strainer while still hot. This will catch and remove any solidified egg bits or undissolved cornstarch. For prevention, whisk continuously during cooking and ensure your cornstarch is fully dissolved in cold liquid before adding it to the hot mixture. Tempering egg yolks gradually with small additions of hot liquid will also prevent them from scrambling and creating lumps.
The Pudding Won’t Thicken
Insufficient thickening usually indicates either too little cornstarch or inadequate cooking time. Your pudding needs to reach a full boil to activate the cornstarch properly. Watch for large bubbles breaking the surface and a noticeable thickening of the mixture. Cook for at least 1-2 minutes after reaching this stage while stirring constantly. If your pudding still refuses to thicken, combine 1 tablespoon cornstarch with 2 tablespoons cold milk in a separate bowl, then whisk this slurry into the hot pudding and return to a boil.
My Butterscotch Tastes Burnt
The fine line between caramelized and burnt butterscotch flavors can be challenging to navigate. A bitter or acrid taste indicates the brown sugar and butter mixture was overcooked. Unfortunately burnt pudding cannot be salvaged. For your next attempt, use medium-low heat and watch the mixture carefully, looking for a deep amber color rather than dark brown. Remove the pan from heat immediately if you detect any burnt smell. Adding a splash of heavy cream to the caramelized sugar mixture can help stop the cooking process at the perfect moment.
Skin Forming On Top
That unappetizing film on your pudding forms when moisture evaporates from the surface during cooling. Prevent skin formation by pressing plastic wrap directly onto the surface of the pudding while it’s still warm. The wrap should touch the entire surface without air bubbles. Alternatively, some butterscotch pudding enthusiasts consider the skin a delicacy and deliberately leave the pudding uncovered while cooling.
Grainy Texture Issues
A grainy texture often results from crystallized sugar or improperly incorporated cornstarch. Ensure all brown sugar completely dissolves during the caramelization stage. Stir continuously and be patient with this process. For cornstarch, always mix it with cold liquid first to create a smooth slurry before adding it to your hot ingredients. Never add dry cornstarch directly to hot liquid as it will instantly clump and create graininess that’s difficult to remedy.
Pudding Separating After Refrigeration
Separation occurs when fat molecules in the pudding isolate from the water-based components during cooling. This issue most commonly happens when the pudding isn’t cooked long enough to fully activate the thickening agents. Ensure your pudding reaches a full boil and maintains it for 1-2 minutes while stirring constantly. If separation has already occurred, try vigorously whisking the pudding to reincorporate the ingredients, though results may vary.
Too Sweet or Not Sweet Enough
Balancing sweetness in butterscotch pudding requires attention to your exact taste preferences. If your pudding turns out too sweet, add a pinch more salt to balance the flavor or serve with unsweetened whipped cream. For pudding that lacks sweetness, drizzle with a small amount of butterscotch sauce before serving or incorporate a sweetened whipped cream topping. Taking notes on your recipe adjustments helps perfect your personal butterscotch pudding formula over time.
Variations to Try
While the classic butterscotch pudding recipe is divine on its own, experimenting with different variations can breathe new life into this nostalgic dessert. Try these creative twists to expand your butterscotch pudding repertoire.
Salted Butterscotch Pudding
Transform your traditional butterscotch pudding into an elegant dessert by adding a sophisticated salt element. Incorporate 1/2 teaspoon of flaky sea salt like Maldon or fleur de sel to the pudding mixture just before removing it from heat. The salt creates a beautiful contrast with the sweet caramel notes and intensifies the butterscotch flavor profile. For an extra indulgent presentation, sprinkle a few flakes of sea salt on top of each serving alongside whipped cream. This sweet-savory combination delivers a more complex taste experience that appeals to modern palates and elevates the humble pudding to restaurant quality.
Butterscotch Pudding Parfaits
Create stunning layered desserts that are perfect for entertaining by turning your butterscotch pudding into parfaits. Start with a layer of crushed graham crackers, shortbread cookies, or gingersnaps at the bottom of clear glasses. Add a layer of chilled butterscotch pudding, followed by freshly whipped cream. Continue alternating layers, finishing with a dollop of whipped cream on top. Garnish your parfaits with crushed toffee bits, butterscotch chips, or a light dusting of cinnamon. For an even more decadent version, add thin layers of caramel sauce between the pudding and cream. These visually appealing desserts require minimal additional effort but make a important impact when served at dinner parties or special occasions.
Chocolate Butterscotch Swirl
Combine two beloved flavors by creating a chocolate butterscotch swirl pudding. Prepare your butterscotch pudding according to the base recipe. Separately, make a simple chocolate pudding using 1/4 cup cocoa powder, 1/3 cup sugar, 2 tablespoons cornstarch, and 2 cups milk, cooked until thickened. Allow both puddings to cool slightly but remain pourable. Pour portions of each pudding alternately into serving dishes and use a knife or skewer to create elegant swirls. The rich chocolate complements the butterscotch beautifully, offering a sophisticated twist on the classic recipe that chocolate lovers will appreciate.
Bourbon Butterscotch Pudding
Add depth and complexity to your butterscotch pudding with a splash of quality bourbon. Stir in 1-2 tablespoons of bourbon after removing the pudding from heat, along with the vanilla extract. The bourbon introduces warm oak and vanilla notes that perfectly complement the caramelized sugar flavors. This adult version makes an impressive dinner party dessert when served in small glasses with a dollop of bourbon-spiked whipped cream. For a non-alcoholic alternative that mimics some of these flavor notes, substitute the bourbon with 1 teaspoon of bourbon vanilla extract or 1 tablespoon of strong brewed coffee.
Butterscotch Banana Pudding
Create a delightful fusion dessert by incorporating bananas into your butterscotch pudding. Line the bottom of a serving dish with vanilla wafer cookies, then add a layer of sliced bananas. Pour half the warm butterscotch pudding over the bananas, add another layer of cookies and bananas, then top with the remaining pudding. Let it chill thoroughly in the refrigerator. The bananas infuse the dessert with natural sweetness while the cookies soften to a cake-like texture. This variation transforms the simple pudding into a more substantial dessert that works beautifully for potlucks and family gatherings.
Vegan Butterscotch Pudding
Adapt this classic dessert for plant-based diets by making a few simple substitutions. Replace butter with plant-based butter or coconut oil for richness. Substitute whole milk with full-fat coconut milk or a blend of coconut and almond milk for creaminess. Instead of egg yolks, use 2 tablespoons of cornstarch mixed with 1 tablespoon of arrowroot powder as a thickener. The coconut milk adds a subtle tropical note that pairs wonderfully with the butterscotch flavors. Top with coconut whipped cream for a fully vegan dessert that sacrifices none of the indulgence of the original recipe.
The Perfect Make-Ahead Dessert
Butterscotch pudding shines as an ideal make-ahead dessert for busy home cooks and entertainers alike. Preparing this luscious treat 24 hours before serving allows the flavors to develop fully creating a more complex and satisfying dessert experience. The pudding actually improves with time as the butterscotch notes deepen and the texture becomes even more velvety.
Planning a dinner party becomes significantly easier when you can cross dessert off your to-do list a day in advance. Simply prepare the pudding following the recipe then transfer it to individual serving dishes before covering and refrigerating. Your guests will never guess this impressive dessert was made the previous day.
For maximum convenience you can prepare components in stages. Make the pudding base up to three days ahead then whip the cream topping fresh just before serving. This approach gives you flexibility while still delivering a dessert that tastes freshly made.
Family gatherings benefit from make-ahead options too. Having butterscotch pudding ready in the refrigerator means you can focus on enjoying time with loved ones rather than rushing around the kitchen after dinner. Kids especially appreciate being able to grab a sweet treat whenever the mood strikes.
The cold temperature intensifies the butterscotch flavor profile making this pudding even more delicious after refrigeration. Many pudding enthusiasts insist that overnight chilling transforms a good dessert into an exceptional one as the ingredients have time to harmonize completely.
Storage couldn’t be simpler when preparing in advance:
- Use airtight containers or cover individual portions with plastic wrap
- Press plastic wrap directly onto pudding surface to prevent skin formation
- Refrigerate for up to 4 days without quality loss
- Bring to room temperature for 10-15 minutes before serving for optimal flavor
Make-ahead butterscotch pudding fits perfectly into meal prep routines allowing you to enjoy homemade desserts throughout the week with minimal effort. This time-saving approach transforms a special treat into an accessible everyday indulgence.
Conclusion
Now you’re ready to create butterscotch pudding that rivals any restaurant dessert. This homemade treat delivers authentic caramel notes and silky texture that boxed versions simply can’t match. With just a few basic ingredients and some careful attention to the caramelization process you’ll master this classic dessert in no time.
Remember that presentation matters almost as much as taste. Whether served in elegant glasses topped with whipped cream or layered with cookies for a delightful parfait your butterscotch pudding will impress family and friends alike.
Don’t hesitate to experiment with the variations suggested or create your own signature version. The beauty of this recipe lies in its flexibility and make-ahead convenience making it perfect for both everyday treats and special occasions.