The best chocolate cake recipe ever is a symphony of rich cocoa and deep fudgy texture.
Having lived in a region known for its world-class chocolate, I’ve spent years perfecting this recipe to bring you the ultimate indulgence.
This cake is not just a dessert; it’s an experience that calls for celebration in every bite.
With its moist crumb and rich flavor, it transforms ordinary moments into extraordinary memories.
Whether it’s a birthday, a holiday, or just a Tuesday, this chocolate cake promises to be the highlight of your day.
The History and Cultural Significance
• Chocolate Cake Recipe traces its origins to the mid-18th century in Europe, where it was originally created by combining cocoa powder with traditional cake batters.
• The dish evolved over decades as baking techniques improved and chocolate became more accessible, eventually becoming the beloved version we know today.
• In Western cultures, this dish traditionally appears at birthdays and weddings, symbolizing indulgence and celebration.
• While many variations exist across different regions, the authentic version maintains a rich, dense texture that sets it apart from lighter, airier imitations.
Recipe Overview
Nutritional Information (per serving)
Essential Equipment Guide
Stand Mixer: A stand mixer ensures even mixing of ingredients, crucial for achieving a consistent batter texture. Hand mixers can be used as an alternative, but they may require more effort to achieve the same results. Look for a mixer with a sturdy base and multiple speed settings.
Springform Pan: A springform pan allows for easy removal of the cake without disturbing its delicate structure. Alternatives include regular cake pans, but they require careful handling to prevent breaking. Choose a pan with a secure latch and non-stick coating.
Offset Spatula: An offset spatula aids in spreading frosting evenly across the cake layers. While a regular knife can work, an offset spatula offers more control and a smoother finish. Opt for one with a comfortable grip and a flexible blade.
Ingredients
For the Cake
|
|
| Amount | Ingredient | Notes |
|---|---|---|
| 1 ¾ cups | all-purpose flour | sifted for light texture |
| 2 cups | granulated sugar | adds sweetness |
| ¾ cup | unsweetened cocoa powder | provides rich chocolate flavor |
| 1 ½ teaspoons | baking powder | helps cake rise |
| 1 ½ teaspoons | baking soda | aids leavening |
| 1 teaspoon | salt | enhances flavor |
| 2 large | eggs | at room temperature, adds structure |
| 1 cup | whole milk | adds moisture |
| ½ cup | vegetable oil | adds tenderness |
| 2 teaspoons | vanilla extract | enhances flavor |
| 1 cup | boiling water | brings out cocoa flavor |
For the Ganache
| Amount | Ingredient | Notes |
|---|---|---|
| 1 cup | heavy cream | provides richness |
| 8 ounces | semi-sweet chocolate | chopped, adds depth of flavor |
Preparation Methods
Creaming Method: This technique involves beating butter and sugar together until light and fluffy, which helps to incorporate air into the batter for a tender cake. Ensure butter is at room temperature for best results.
Blooming Cocoa: Blooming cocoa in boiling water intensifies its flavor, making the chocolate taste more robust and nuanced. Mix cocoa with hot water until dissolved and let it cool before adding to the batter.
Folding: Folding involves gently combining a lighter mixture, like beaten egg whites, into a heavier batter to maintain airiness. Use a spatula to incorporate with slow, deliberate movements.
Step 1: Preheat Oven

Preheat your oven to 350°F (175°C).
Ensure the oven rack is in the center position.
This allows even heat distribution for baking.
Proper preheating is crucial for consistent results.
Step 2: Prepare Baking Pan

Grease and flour a 9-inch springform pan.
Ensure all surfaces are evenly coated to prevent sticking.
Tap out excess flour for a smooth finish.
This step ensures your cake releases easily.
Step 3: Mix Dry Ingredients

In a large bowl, sift together flour, sugar, cocoa, baking powder, baking soda, and salt.
Whisk until thoroughly combined.
Look for a uniform color and texture.
This ensures even distribution of leavening agents.
Step 4: Blend Wet Ingredients

In another bowl, combine eggs, milk, oil, and vanilla.
Use a stand mixer to beat on medium speed until smooth.
Ensure the mixture is homogenous.
This step creates the base for your batter.
Step 5: Combine All Ingredients

Gradually add the wet mixture to the dry ingredients.
Mix on low speed until just combined.
Be careful not to overmix as this can make the cake tough.
Look for a smooth, lump-free batter.
Step 6: Add Boiling Water

Slowly stir in the boiling water to the batter.
Mix until incorporated; the batter will be thin.
This step enhances the cocoa flavor and creates a moist cake.
Pour gently to avoid splashes.
Step 7: Bake the Cake

Pour the batter into the prepared pan.
Bake for 30-35 minutes, or until a toothpick inserted comes out clean.
The cake should rise evenly with a slight dome.
Avoid opening the oven door too early to prevent sinking.
Step 8: Prepare the Ganache
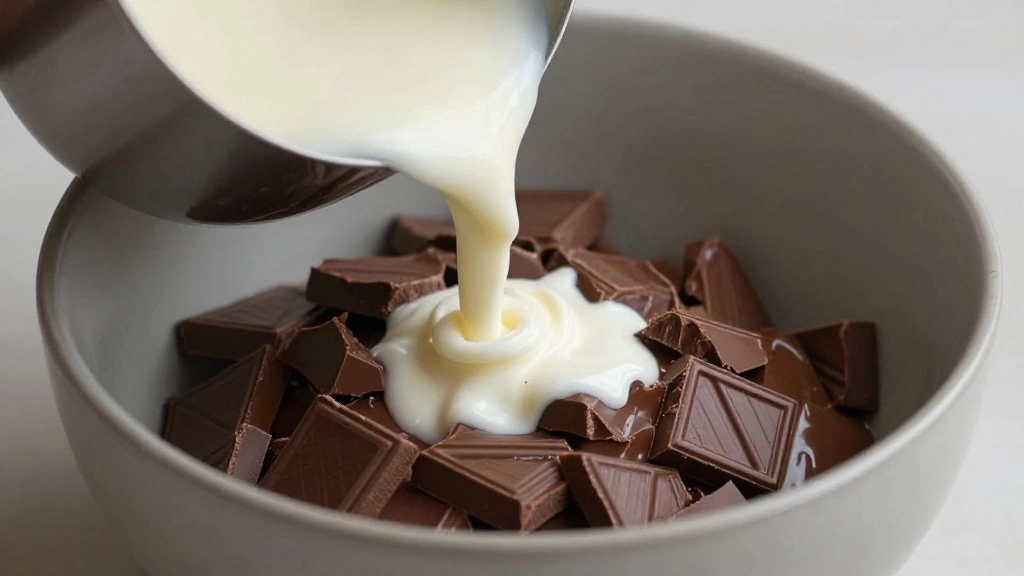
Heat cream in a small saucepan until it just begins to simmer.
Remove from heat and pour over chopped chocolate.
Allow it to sit for 5 minutes, then stir until smooth.
This creates a glossy ganache perfect for frosting.
Step 9: Cool and Frost the Cake
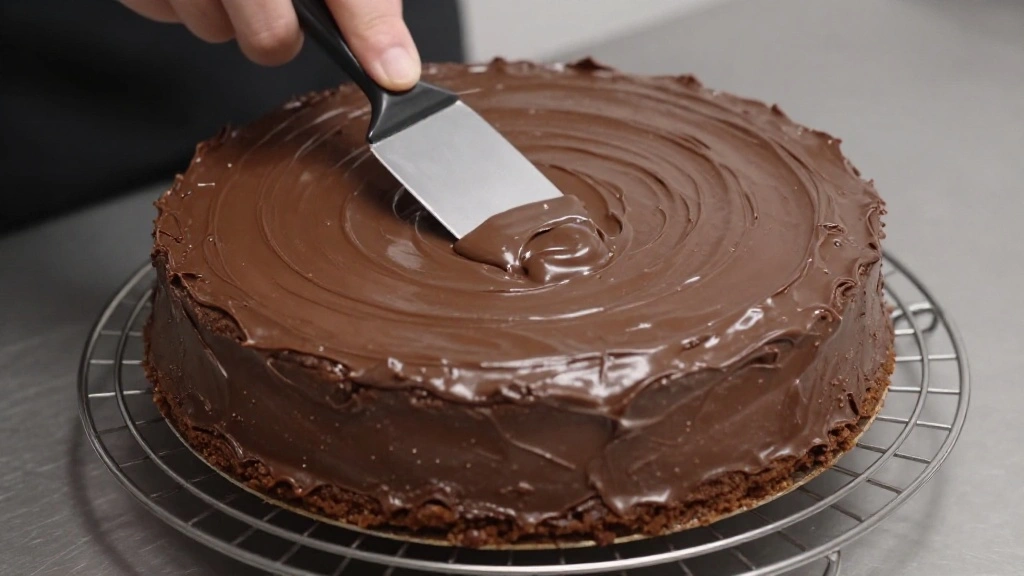
Allow the cake to cool in the pan for 10 minutes.
Remove from pan and transfer to a wire rack to cool completely.
Spread ganache evenly over the top and sides.
Use an offset spatula for a smooth finish.
Step 10: Serve and Enjoy
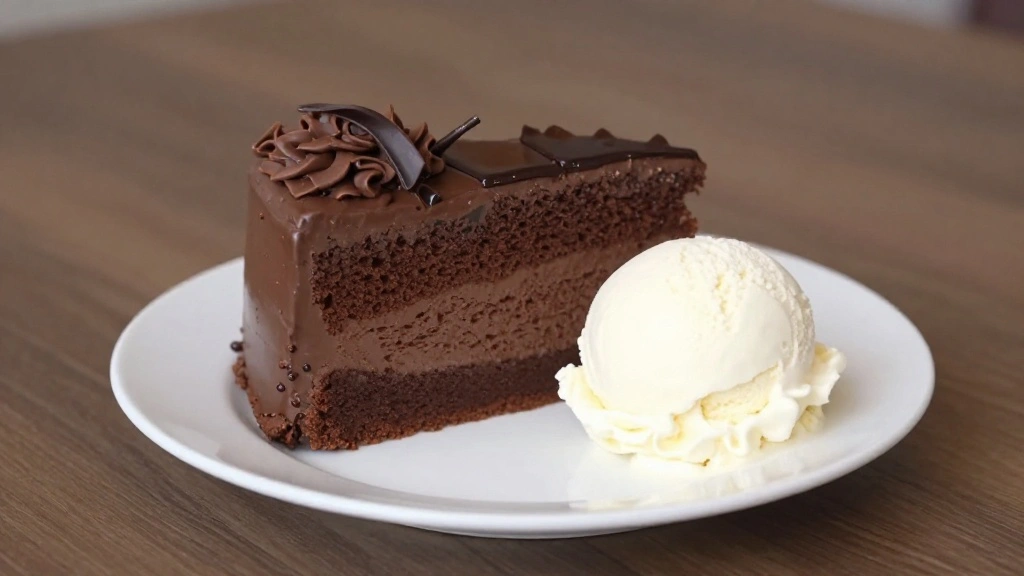
Slice the cake with a sharp knife.
Serve with a dollop of whipped cream or a scoop of vanilla ice cream.
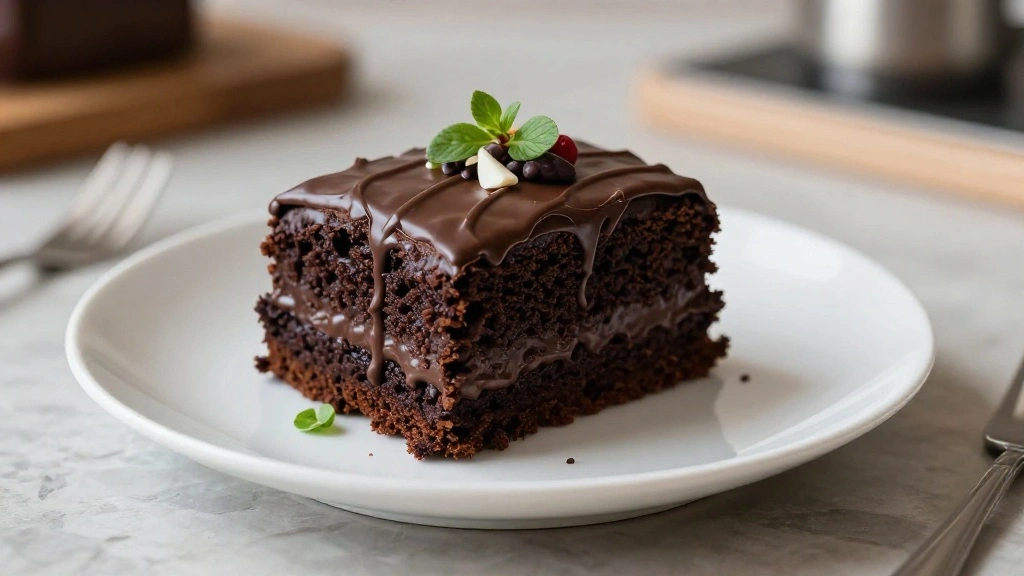
The cake should be moist with a dense, fudgy texture.
Enjoy the fruits of your labor with friends and family.
Critical Timing and Temperature Guide
Baking the Cake: Bake at 350°F for 30-35 minutes. Look for a clean toothpick test and a slight spring in the cake center. Avoid opening the oven early to prevent the cake from falling.
Ganache Preparation: Bring cream to just simmering, around 180°F. Watch for bubbles forming at the edges without boiling over. Stirring too soon can result in a grainy texture.
Cooling the Cake: Allow the cake to cool for 10 minutes in the pan before transferring to a rack. The residual heat continues cooking, so premature removal can cause structural issues.
Pro Tips for Chocolate Cake Recipe
• Ingredient Selection: Use high-quality cocoa powder and real vanilla extract for the best flavor impact.
• Preparation Secret: Sifting dry ingredients ensures no lumps and a uniform texture, often skipped by home cooks.
• Temperature Management: Ensure all ingredients, especially eggs and milk, are at room temperature to blend seamlessly.
• Texture Enhancement: Adding boiling water to the batter creates a moist, fudgy cake.
• Flavor Layering: Bloom cocoa in boiling water to deepen the chocolate flavor for a more intense taste.
• Make-Ahead Strategies: The cake can be baked a day in advance and stored, wrapped tightly, at room temperature.
• Restaurant-Quality Finishing Touches: Dust with cocoa powder or add chocolate shavings for an elegant finish.
• Equipment Optimization: Use a high-quality non-stick springform pan to avoid sticking and ensure clean cake edges.
Troubleshooting Common Issues
• Texture Too Dense: This can be caused by overmixing the batter. Mix just until ingredients are combined to avoid over-developing gluten.
• Cake Falls in the Center: This is often due to opening the oven door too early or overbeating the batter. Check doneness only after the minimum bake time.
• Ganache Not Setting: If the ganache is too runny, it may need more chocolate or time to cool. Use a higher chocolate-to-cream ratio for thicker ganache.
• Crumbly Texture: This can result from not enough moisture. Ensure you measure liquids accurately and avoid overbaking.
• Cake Sticks to Pan: Grease and flour the pan thoroughly. Consider using parchment paper for added security.
• Uneven Baking: This might be due to uneven oven temperature. Rotate the cake halfway through baking for even heat distribution.
Variations and Regional Differences
• Mexican Chocolate Cake: This version includes cinnamon and cayenne for a spicy kick, reflecting Mexican culinary traditions.
• German Chocolate Cake: Features a distinct coconut-pecan frosting that sets it apart from typical chocolate cakes.
• French Flourless Chocolate Cake: Known for its dense, fudgy texture, it uses almond flour or no flour at all, focusing on the chocolate essence.
• Italian Chocolate Almond Cake: Incorporates ground almonds and is often paired with powdered sugar and berries.
Food Science Behind the Recipe
• Maillard Reaction: This chemical reaction between amino acids and reducing sugars gives the cake its rich, browned flavor profile.
• Emulsification: The process of combining fat with water-based ingredients (like eggs and oil) creates a stable batter that holds air and moisture.
• Leavening Agents: Baking powder and soda react with acids and heat to produce carbon dioxide, helping the cake rise and achieve a light texture.
Frequently Asked Questions
What's the most common mistake people make when preparing chocolate cake? Overmixing the batter, which leads to a dense cake.
Can I substitute cocoa powder with melted chocolate? Yes, but it alters the texture and flavor. Adjust sugar and fat content accordingly.
How do I store leftover cake? Wrap tightly in plastic wrap or store in an airtight container; refrigerate for up to a week.
Can I use a different type of flour? All-purpose flour is recommended, but cake flour can be used for a lighter texture.
Why is my ganache grainy? Overheating the cream or stirring too soon can cause this. Let the mixture sit before stirring.
How can I make the cake gluten-free? Substitute with a 1:1 gluten-free baking mix, ensuring it contains xanthan gum.
Can I use a hand mixer instead? Yes, but mix on lower speeds to avoid overbeating the batter.
Serving and Presentation Guide
• Traditional Presentation: Serve on a cake stand with a dusting of cocoa powder or powdered sugar.
• Gourmet Style: Pair with a scoop of artisan vanilla ice cream and a drizzle of raspberry coulis.
• Casual Setting: Slice and serve with fresh berries on the side for a pop of color and freshness.
• Elegant Touch: Garnish with chocolate curls or shavings for a sophisticated finish.
Conclusion
This rich and fudgy chocolate cake is more than just a dessert; it's a celebration of flavors and textures.
With this recipe, you'll be able to create a cake that's sure to impress anyone who takes a bite.
Don't wait for a special occasion to indulge—make this cake and elevate any day into a memorable one.