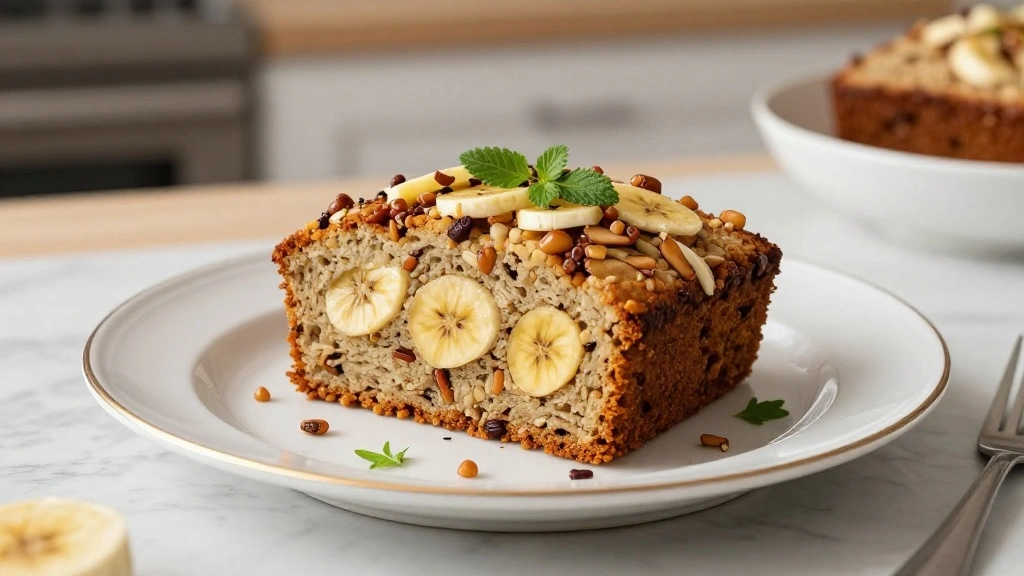
There’s something incredibly comforting about the aroma of freshly baked banana nut bread wafting through the kitchen.
With its soft and moist texture, this banana nut bread is the perfect balance of sweet and nutty flavors.
I first fell in love with this recipe during a cozy winter afternoon, and it has since become a family favorite.
Whether you’re looking for a breakfast treat or an afternoon snack, this banana nut bread is sure to please everyone at the table.
The blend of ripe bananas and crunchy nuts creates a delightful experience in every bite.
Get ready to bake a loaf that will become a staple in your recipe collection.
The History and Cultural Significance
• Soft & Sweet banana nut bread traces its origins to the United States during the Great Depression, where it was originally created by resourceful bakers looking to use overripe bananas.
• The dish evolved over decades as baking powder and soda became more widely used, eventually becoming the beloved version we know today.
• In American culture, this dish traditionally appears at breakfast tables and family gatherings, symbolizing comfort and home.
• While many variations exist across different regions, the authentic version maintains a moist texture and a rich banana flavor that sets it apart from imitations.
Recipe Overview
Nutritional Information (per serving)
Essential Equipment Guide
Loaf Pan: A quality loaf pan is crucial for achieving the right shape and even cooking. A metal pan with a non-stick coating works best, although silicone alternatives can also work if you’re cautious about baking time.
Mixing Bowls: A set of mixing bowls is important for combining ingredients separately before mixing. Look for bowls with a non-slip base for ease of use.
Electric Mixer: An electric mixer is essential for creaming the butter and sugar to achieve a light and airy batter. A hand mixer can work, but a stand mixer is preferred for consistent results.
Ingredients
For the Base
|
|
| Amount | Ingredient | Notes |
|---|---|---|
| 2 cups | all-purpose flour | sifted for light texture |
| 1 teaspoon | baking soda | ensures the bread rises properly |
| 1/4 teaspoon | salt | enhances flavor |
Wet Ingredients
| Amount | Ingredient | Notes |
|---|---|---|
| 1/2 cup | unsalted butter | softened, adds richness |
| 3/4 cup | brown sugar | adds sweetness and moisture |
| 2 large | eggs | room temperature, for binding |
| 3 large | bananas | overripe, mashed for flavor |
Add-ins
| Amount | Ingredient | Notes |
|---|---|---|
| 1 cup | chopped walnuts | adds crunch and nuttiness |
| 1 teaspoon | vanilla extract | enhances flavor |
Preparation Methods
Creaming Method: This technique involves beating the butter and sugar together until light and fluffy, which incorporates air into the batter, leading to a lighter bread.
Folding Technique: Gently folding the dry ingredients into the wet ingredients helps retain the air bubbles and ensures a tender crumb.
Mashing Bananas: Properly mashing bananas is essential for even distribution in the batter. Ensure bananas are thoroughly mashed with minimal lumps.
Step 1: Preheat the Oven

Preheat your oven to 350°F (175°C).
Ensure the oven rack is positioned in the middle.
This helps ensure even baking.
Proper preheating is crucial for consistent results.
Step 2: Prepare the Loaf Pan
Grease a 9x5 inch loaf pan with butter or non-stick spray.
Ensure all sides and corners are well coated.
This prevents the bread from sticking.
Use parchment paper as an alternative for easy removal.
Step 3: Cream Butter and Sugar

In a mixing bowl, cream together the softened butter and brown sugar.
Use an electric mixer on medium speed.
Mix until the mixture is light and fluffy.
This step helps create a soft texture.
Step 4: Add Eggs and Vanilla
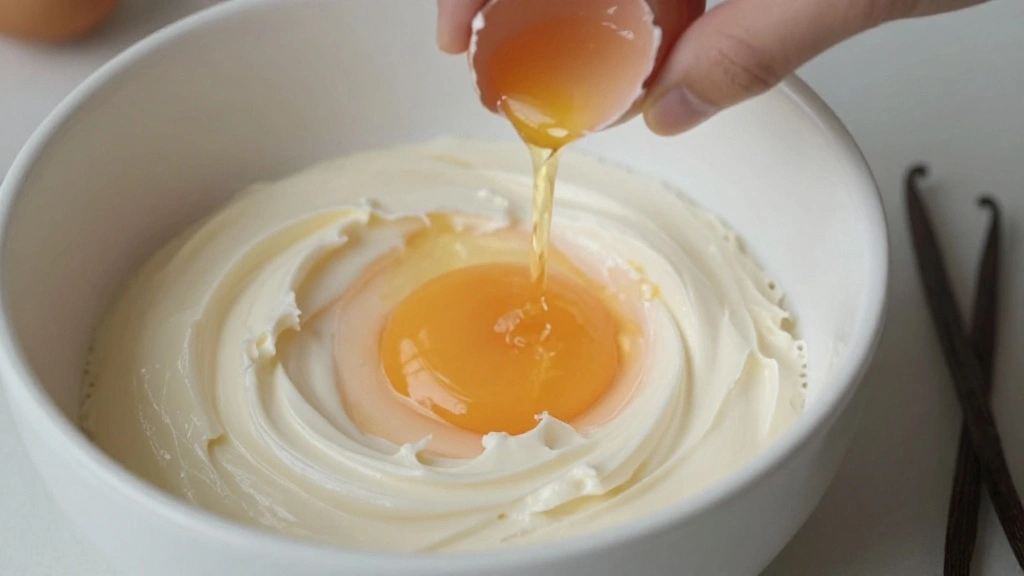
Add the eggs one at a time to the creamed mixture.
Beat well after each addition.
Add the vanilla extract and mix until combined.
This integrates the wet ingredients thoroughly.
Step 5: Mash and Add Bananas
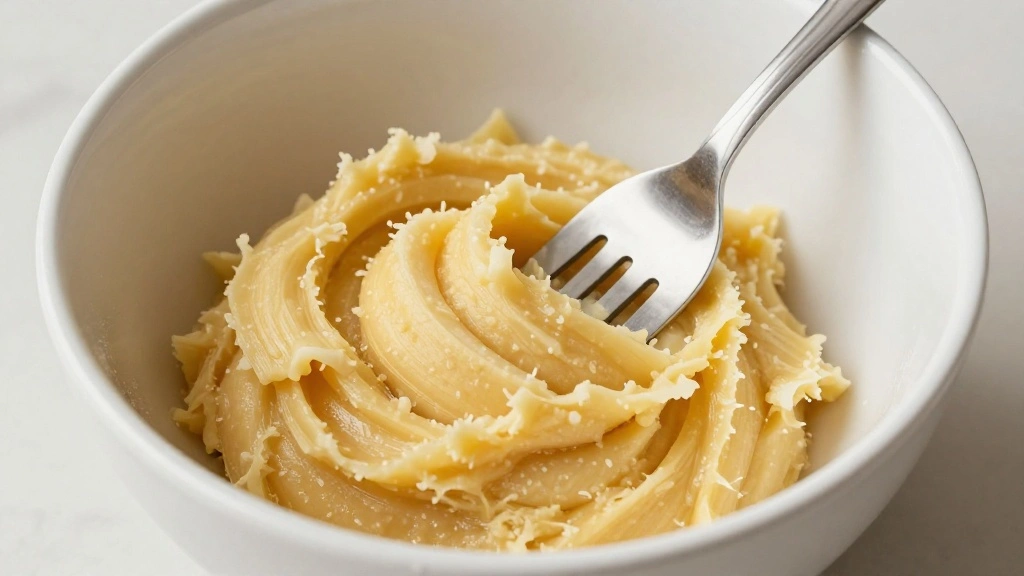
In a separate bowl, mash the bananas until smooth.
Add the mashed bananas to the wet mixture.
Mix until well combined.
This adds flavor and moisture to the bread.
Step 6: Combine Dry Ingredients

In another bowl, sift together the flour, baking soda, and salt.
Ensure there are no lumps.
This helps with even distribution in the batter.
Sifting adds air to the mixture, promoting a light texture.
Step 7: Fold Ingredients Together

Gently fold the dry ingredients into the wet mixture.
Use a spatula to combine with a light hand.
Avoid over-mixing to prevent a dense bread.
The batter should be thick and slightly lumpy.
Step 8: Add Walnuts and Pour Batter
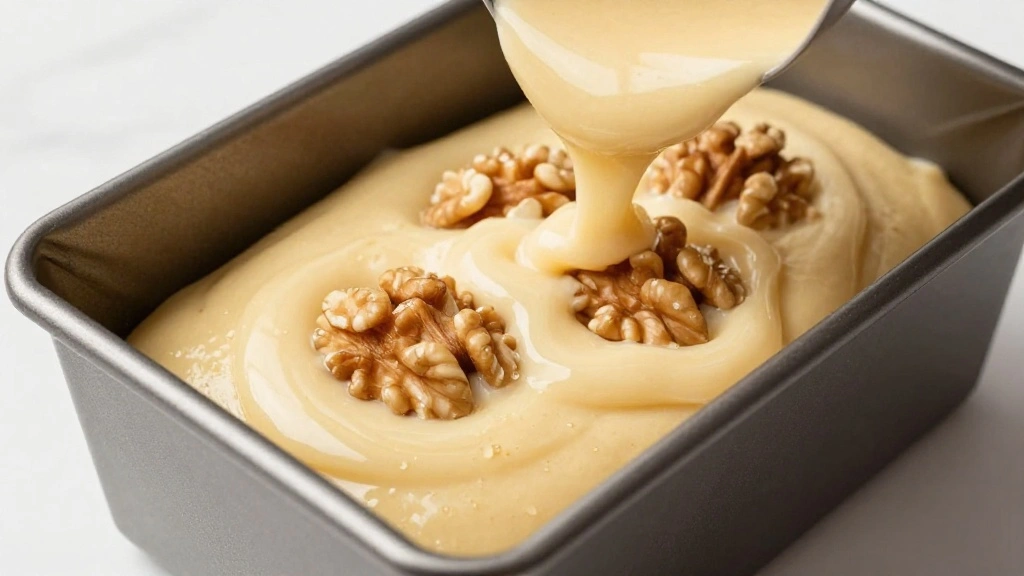
Fold in the chopped walnuts.
Ensure they are evenly distributed.
Pour the batter into the prepared loaf pan.
Smooth the top with a spatula for even baking.
Step 9: Bake the Bread
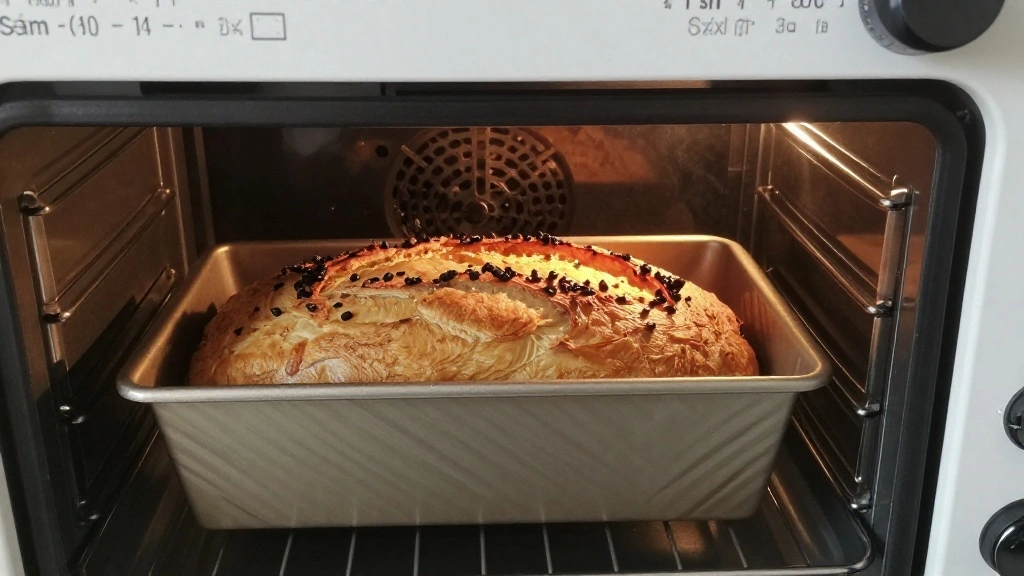
Place the loaf pan in the preheated oven.
Bake for 60 minutes or until a toothpick inserted comes out clean.
Check halfway through and rotate if necessary.
Proper baking ensures a moist interior.
Step 10: Cool and Serve
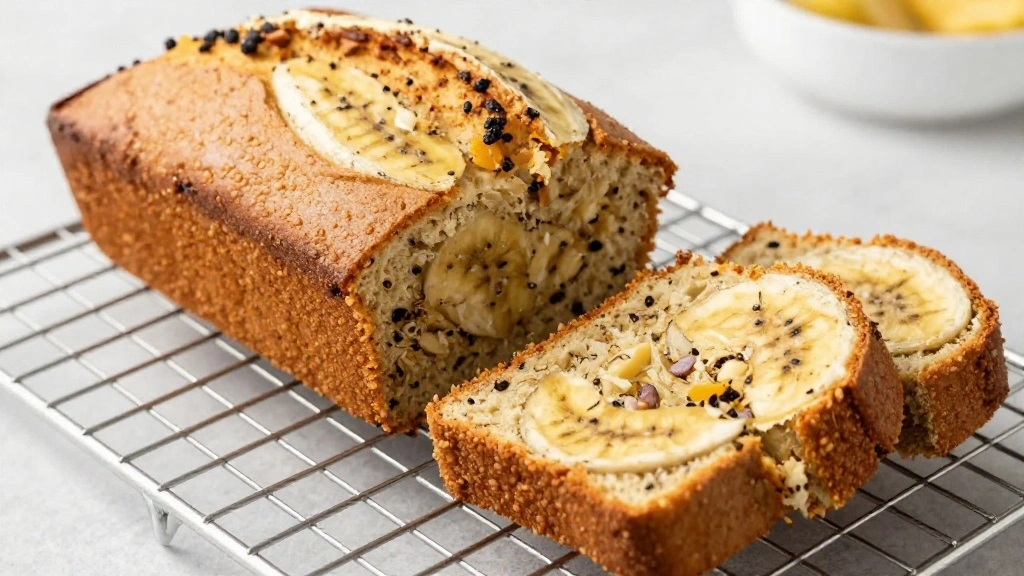
Remove the bread from the oven and let it cool in the pan for 10 minutes.
Transfer to a wire rack to cool completely.
Slice and serve once cooled.
Cooling helps set the texture.
Critical Timing and Temperature Guide
Baking: Bake at 350°F (175°C) for 60 minutes. Check for doneness with a toothpick inserted in the center. Avoid opening the oven frequently to prevent temperature fluctuations.
Cooling: Allow to cool in the pan for 10 minutes before transferring to a wire rack. This prevents the bread from breaking apart. Ensure complete cooling before slicing.
Ingredient Temperatures: Use room temperature eggs and softened butter for better emulsification. Cold ingredients can lead to a dense batter.
Pro Tips for Soft & Sweet
• Ingredient Selection: Choose overripe bananas for the best flavor and moisture. The riper the bananas, the sweeter and more flavorful your bread will be.
• Preparation Secret: Allow the batter to rest for a few minutes before baking. This helps with gluten relaxation, resulting in a softer texture.
• Temperature Management: Make sure your oven is properly preheated before baking to ensure even cooking.
• Texture Enhancement: Sift dry ingredients to incorporate air and prevent lumps, leading to a lighter bread.
• Flavor Layering: Toast the walnuts lightly before adding them to enhance their nutty flavor.
• Make-Ahead Strategies: Prepare and store mashed bananas in the freezer for quick access when baking. Thaw before use.
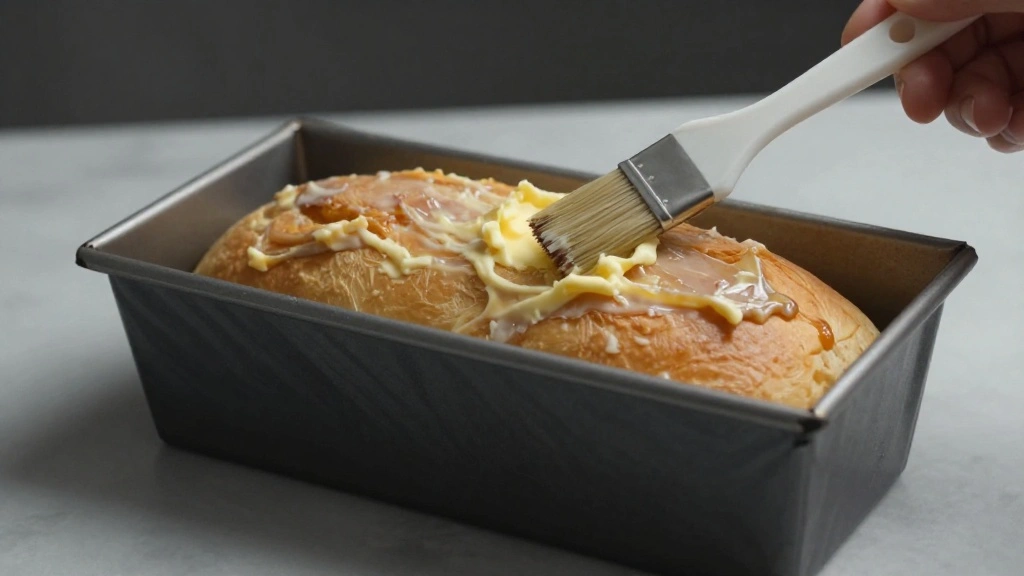
• Restaurant-Quality Finishing Touches: Brush the top of the bread with melted butter right after baking for a glossy finish.
• Equipment Optimization: Use a silicone spatula for folding to minimize batter deflation.
Troubleshooting Common Issues
• Texture Too Dense: This can be caused by over-mixing. Ensure you fold ingredients gently and avoid using a mixer for this step.
• Undercooked Center: If the center is undercooked, your oven temperature may be inaccurate. Use an oven thermometer to verify it's properly calibrated.
• Sinking Bread: Ensure the batter is not too wet and that you're not overfilling the pan. Make sure baking soda is fresh.
• Crumbly Texture: This may happen if the bread is not allowed to cool properly before slicing. Allow full cooling on a wire rack.
• Lack of Banana Flavor: Use very ripe bananas and consider adding an extra banana if the flavor is too subtle.
• Bitter Taste: This can be caused by too much baking soda or using old nuts. Measure carefully and use fresh ingredients.
Variations and Regional Differences
• Southern Style: Includes pecans instead of walnuts and a touch of cinnamon for added warmth and spice.
• Hawaiian Style: Incorporates crushed pineapple and coconut flakes for a tropical twist on the classic.
• Vegan Version: Uses flaxseed meal and water as a substitute for eggs, and coconut oil instead of butter.
• Gluten-Free Option: Replaces all-purpose flour with a gluten-free flour blend for those with dietary restrictions.
Food Science Behind the Recipe
• Leavening Agents: Baking soda reacts with the acids in bananas to produce carbon dioxide, which helps the bread rise.
• Maillard Reaction: The browning of the sugar and proteins in the bread creates a rich flavor and appealing color.
• Emulsification: The process of creaming butter and sugar creates an emulsion that traps air, leading to a fluffy texture.
Frequently Asked Questions
What's the most common mistake people make when preparing banana nut bread? Over-mixing the batter, which can result in a dense texture.
How can I ensure my banana bread stays moist? Use overripe bananas and measure ingredients accurately.
Can I freeze banana nut bread? Yes, wrap it tightly in plastic and store in a freezer-safe bag for up to 3 months.
Why does my bread always come out unevenly baked? Ensure your oven is properly preheated and rotate the bread if necessary halfway through baking.
What's the best way to mash bananas? Use a fork or potato masher to achieve a smooth consistency with minimal lumps.
Can I substitute nuts in the recipe? Yes, you can use any nuts or omit them entirely if you prefer.
How can I add more flavor to my banana nut bread? Consider adding spices like cinnamon or nutmeg, or mix-ins like chocolate chips.
Serving and Presentation Guide
• Traditional Presentation: Serve slices on a wooden board, with butter on the side for spreading.
• Brunch Display: Arrange slices on a tiered cake stand with fresh fruits and a dusting of powdered sugar.
• Gift Presentation: Wrap in parchment paper and tie with a string for a homemade gift look.
• Café Style: Serve with a side of cream cheese or mascarpone for a café-style experience.
Conclusion
With its inviting aroma and delightful taste, this Soft & Sweet Banana Nut Bread is sure to become a favorite in your household.
Don't hesitate to try this recipe and share it with friends and family who will surely appreciate its comforting flavors.
Baking this banana nut bread is not just about making a delicious treat, but also about creating warm memories that last a lifetime.