
The Easy No-Bake Chocolate Eclair Cake is a delightful dessert that combines layers of graham crackers, creamy vanilla pudding, and rich chocolate glaze.
Its no-bake nature makes it an appealing choice for busy home cooks who crave indulgence without the fuss of baking.
With its smooth texture and decadent flavor, this cake is a crowd-pleaser at any gathering or family dinner.
I first discovered this irresistible recipe during a summer picnic where it was the star dessert, and I’ve been making it ever since.
Whether you’re a seasoned baker or a novice in the kitchen, this recipe offers impressive results with minimal effort.
Prepare to savor a taste of nostalgia with every creamy bite.
The History and Cultural Significance
• No-Bake Chocolate Eclair traces its origins to mid-20th-century America, where it was originally created as a simple, no-fuss dessert.
• The dish evolved over decades as convenience foods became more popular, eventually becoming the beloved version we know today.
• In American culture, this dish traditionally appears at potlucks and family gatherings, symbolizing comfort and shared memories.
• While many variations exist across different regions, the authentic version maintains its layered structure and creamy texture that sets it apart from imitations.
Recipe Overview
Nutritional Information (per serving)
Essential Equipment Guide
Mixing Bowl: A large mixing bowl is essential for combining the pudding mix and milk to achieve a smooth, lump-free consistency. While any bowl will do, one with a non-slip base will make the process easier.
Whisk: A whisk is important for blending the pudding mix and milk thoroughly. An electric mixer can serve as an alternative for faster results, but a manual whisk allows for greater control.
9×13-inch Baking Dish: This dish is ideal for assembling the layers of the cake, ensuring even distribution and easy serving. A clear glass dish also allows you to showcase the beautiful layers.
Ingredients
For the Base
|
|
| Amount | Ingredient | Notes |
|---|---|---|
| 2 packs | graham crackers | forms the cake layers |
For the Filling
| Amount | Ingredient | Notes |
|---|---|---|
| 2 packages | instant vanilla pudding mix | creates creaminess |
| 3 cups | milk | for preparing pudding |
| 1 container | whipped topping | adds lightness |
For the Sauce
| Amount | Ingredient | Notes |
|---|---|---|
| 1/2 cup | unsweetened cocoa powder | rich chocolate flavor |
| 1 cup | sugar | sweetens the glaze |
| 1/4 cup | milk | thins the glaze |
| 1/2 cup | butter | adds gloss and richness |
Preparation Methods
Layering Technique: Carefully layering the graham crackers and pudding mixture is crucial for achieving the signature structure of the eclair cake. Ensure each layer is even for a consistent texture and appearance.
Pudding Preparation: Properly mixing the instant pudding mix with milk is key to preventing lumps. Use a whisk and mix vigorously to ensure a smooth, creamy result.
Chocolate Glaze: Preparing the chocolate glaze involves heating and combining ingredients until smooth. This step is essential for a glossy finish that contrasts beautifully with the creamy layers.
Step 1: Prepare Pudding Mixture

In a large mixing bowl, combine the instant vanilla pudding mix and milk.
Use a whisk to thoroughly blend until smooth and thickened.
Ensure there are no lumps remaining in the mixture.
Allow the pudding to set for about 5 minutes to reach full thickness.
Step 2: Incorporate Whipped Topping

Gently fold the whipped topping into the prepared pudding mixture.
Use a spatula to ensure the whipped topping is evenly distributed.
The mixture should be light and fluffy without any streaks of whipped topping.
Take care not to deflate the whipped topping while mixing.
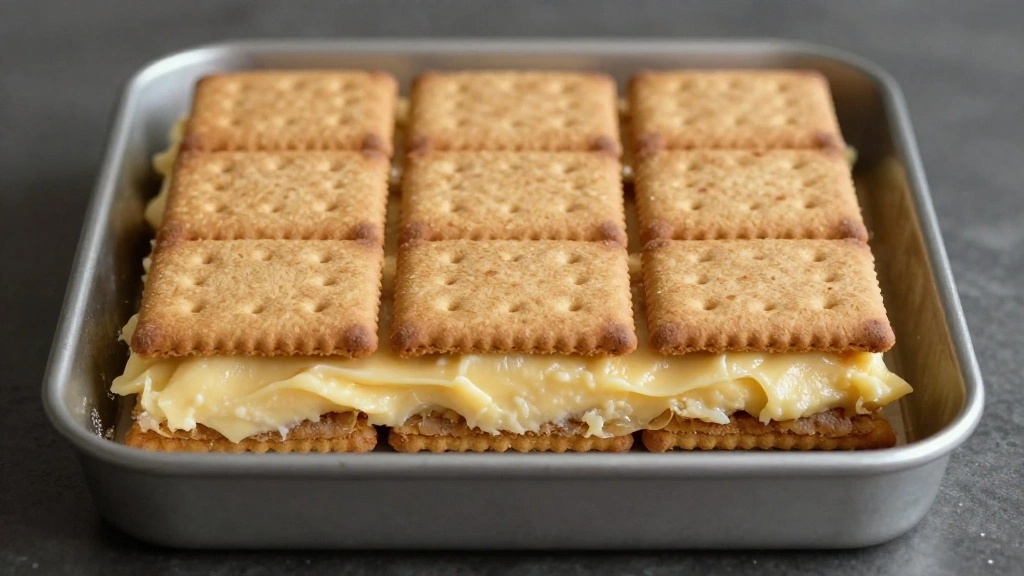
Step 3: Layer the Base

Place a single layer of graham crackers at the bottom of a 9x13-inch baking dish.
Break the crackers to fit the dish as needed, ensuring full coverage.
This forms the first layer of the cake structure.
Ensure the crackers are placed evenly without overlapping.
Step 4: Add Pudding Layer

Spread half of the pudding mixture over the graham crackers.
Use a spatula to ensure even coverage and smooth surface.
This creates the first creamy layer of the cake.
Check for any visible gaps or uneven areas and adjust accordingly.
Step 5: Repeat Layers
Add another layer of graham crackers on top of the pudding layer.
Follow with the remaining pudding mixture, spreading evenly.
Finish with a final layer of graham crackers on top.
Ensure each layer is neat and uniform for the best results.
Step 6: Prepare Chocolate Glaze

In a small saucepan, combine cocoa powder, sugar, milk, and butter.
Heat over medium heat, stirring constantly until smooth and glossy.
The glaze should be thick yet pourable for an easy application.
Remove from heat once fully combined and smooth.
Step 7: Apply Chocolate Glaze

Pour the prepared chocolate glaze over the top layer of graham crackers.
Use a spatula to spread the glaze evenly across the surface.
Ensure the glaze covers the entire top layer for a complete finish.
Allow the glaze to set slightly before the next step.
Step 8: Chill and Serve

Cover the baking dish with plastic wrap or foil.
Refrigerate the eclair cake for at least 4 hours or overnight.
This allows the flavors to meld and the cake to set properly.
Slice into squares and serve chilled for the best taste and texture.
Critical Timing and Temperature Guide
Pudding Setting: Allow pudding to set for at least 5 minutes. Look for a thickened consistency before proceeding. Avoid rushing this step to prevent runny pudding.
Chocolate Glaze Preparation: Heat glaze ingredients over medium heat until just combined and smooth. Do not overheat to prevent burning.
Chilling Time: Refrigerate the assembled cake for a minimum of 4 hours. The cake should be firm and flavors well-melded before serving.
Pro Tips for No-Bake Chocolate Eclair
• Ingredient Selection: Choose high-quality cocoa powder for the glaze to enhance the chocolate flavor and richness.
• Preparation Secret: Allow the pudding and whipped topping to come to room temperature before mixing for easier blending and smoother texture.
• Temperature Management: Keep ingredients cool before assembling to ensure layers set properly without becoming soggy.
• Texture Enhancement: Use a spatula to gently fold the whipped topping into the pudding for a lighter, airier texture.
• Flavor Layering: Add a dash of vanilla extract to the pudding mixture for enhanced depth of flavor.
• Make-Ahead Strategies: Prepare the cake a day in advance to allow flavors to meld beautifully; store covered in the refrigerator.
• Restaurant-Quality Finishing Touches: Garnish with chocolate shavings or fresh berries before serving for an elegant presentation.
• Equipment Optimization: Use a rubber spatula for smooth spreading and even layering during assembly.
Troubleshooting Common Issues
• Runny Pudding: Ensure pudding mix and milk are thoroughly whisked. If still runny, refrigerate longer or reduce milk slightly.
• Soggy Layers: Use fresh graham crackers and ensure layers are not over-soaked with pudding.
• Lumpy Pudding: Whisk pudding mix vigorously to eliminate lumps, or use an electric mixer for smoother results.
• Uneven Layers: Take time to spread each layer evenly. Use a spatula to check and adjust as needed.
• Glaze Too Thick: If glaze thickens too much, gently reheat and add a splash of milk to thin.
• Flavors Not Melding: Ensure adequate chilling time to allow flavors to meld and enhance each other.
Variations and Regional Differences
• French Eclair Style: Incorporates pastry cream and choux pastry instead of graham crackers and pudding for a traditional French approach.
• Italian Tiramisu Twist: Uses coffee-soaked ladyfingers and mascarpone cheese, infusing the cake with bold coffee flavors.
• Mexican Chocolate Version: Adds a hint of cinnamon and cayenne to the chocolate glaze for a spicy, warm twist.
• Fruit Layer Variation: Includes layers of sliced bananas or strawberries for added freshness and flavor contrast.
Food Science Behind the Recipe
• Emulsification: The combination of cocoa powder and butter in the glaze creates a stable emulsion, providing a glossy finish.
• Gelatinization: The starches in the pudding mix thicken as they absorb liquid, creating a creamy texture essential for the cake's structure.
• Layer Integration: As the cake chills, the graham crackers absorb moisture from the pudding, softening into cake-like layers without becoming mushy.
Frequently Asked Questions
What's the most common mistake people make when preparing No-Bake Chocolate Eclair Cake? Over-soaking the graham crackers, which can lead to a soggy texture.
Can I use homemade pudding instead of instant? Yes, but ensure it is thickened properly before layering to avoid a runny cake.
How can I make the cake less sweet? Reduce the sugar in the chocolate glaze or use less sweetened whipped topping.
What can I use instead of graham crackers? Try vanilla wafers or digestive biscuits for a different flavor profile.
Can I freeze the cake to set it faster? It's not recommended, as freezing can alter the texture of the pudding and whipped topping.
Is it possible to make a dairy-free version? Yes, use almond milk for the pudding and a dairy-free whipped topping alternative.
How long can the cake be stored? Store in the refrigerator for up to 3 days for the best taste and texture.
Serving and Presentation Guide
• Traditional Presentation: Serve chilled in slices, showcasing the layered structure on a simple white plate for a classic look.
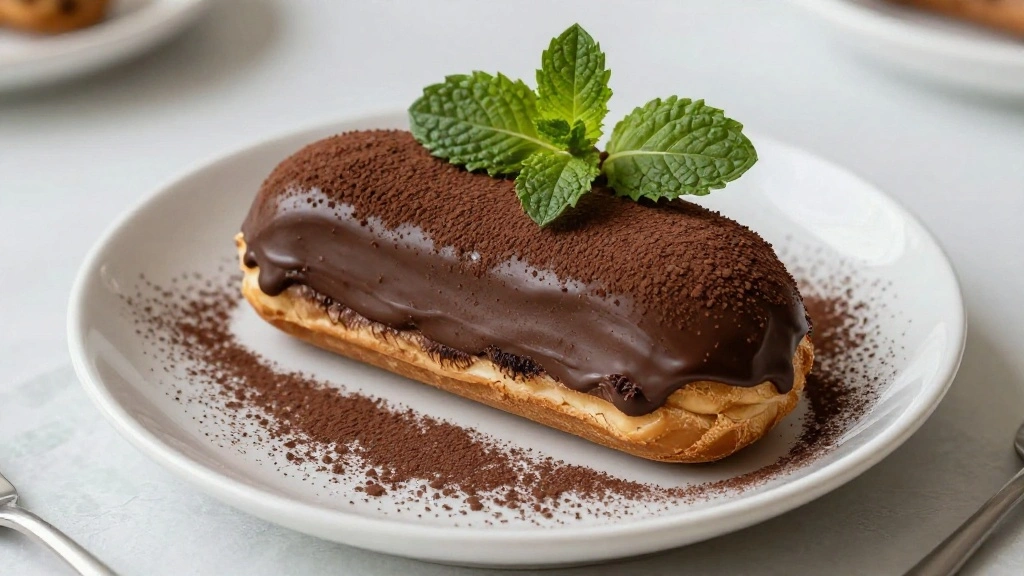
• Elevated Presentation: Garnish with fresh mint leaves and a dusting of cocoa powder for a sophisticated touch.
• Casual Presentation: Serve in small, individual dishes or cups for easy portion control at gatherings.
• Seasonal Presentation: Top with seasonal berries or edible flowers to add a pop of color and freshness.
Conclusion
The Easy No-Bake Chocolate Eclair Cake is a testament to how simple ingredients can create a delicious, crowd-pleasing dessert.
Whether you're entertaining guests or treating your family, this cake offers a perfect balance of creamy and chocolatey flavors.
I hope this recipe inspires you to bring a touch of sweetness to your next gathering.
Enjoy the delightful process of crafting this no-bake wonder and savor each decadent bite.