This decadent Chocolate Tres Leches Cake brings together the rich indulgence of chocolate with the classic moistness of tres leches.
Imagine a cake so soaked and luscious that each bite feels like a celebration in itself.
Originating from Latin American culinary traditions, this cake has been reimagined for chocolate lovers everywhere.
The harmonious blend of chocolate, milk, and cream creates an unforgettable taste experience.
Whether you’re hosting a festive gathering or simply treating yourself, this Chocolate Tres Leches Cake promises to impress with its intense flavor and velvety texture.
The History and Cultural Significance
• Chocolate Tres Leches traces its origins to Latin America, where it was originally created by local bakers adding cocoa to the traditional tres leches cake.
• The dish evolved over decades as bakers experimented with different types of chocolate and milk, eventually becoming the beloved version we know today.
• In many Latin cultures, this dish traditionally appears at birthdays and family gatherings, symbolizing abundance and unity.
• While many variations exist across different regions, the authentic version maintains its ultra-moist texture that sets it apart from imitations.
Recipe Overview
Nutritional Information (per serving)
Essential Equipment Guide
Springform Pan: A springform pan is crucial for easy removal of the cake without damaging its structure. Alternatives like a deep cake pan can work, but ensure it has a non-stick surface.
Electric Mixer: An electric mixer ensures the batter is smooth and well-aerated, which is essential for the cake’s texture. A stand mixer with a whisk attachment is ideal, though a hand mixer works too.
Cooling Rack: A cooling rack allows the cake to cool evenly and prevents condensation from making the bottom soggy. A simple wire rack works best.
Ingredients
For the Cake
|
|
| Amount | Ingredient | Notes |
|---|---|---|
| 1 cup | all-purpose flour | adds structure |
| 1/3 cup | unsweetened cocoa powder | for rich chocolate flavor |
| 1 teaspoon | baking powder | helps cake rise |
| 1/2 teaspoon | salt | enhances flavor |
| 5 large | eggs | separated, room temperature |
| 1 cup | granulated sugar | sweetens and stabilizes |
For the Milk Mixture
| Amount | Ingredient | Notes |
|---|---|---|
| 1 can (14 oz) | sweetened condensed milk | adds moisture |
| 1 cup | evaporated milk | rich and creamy texture |
| 1/2 cup | heavy cream | for extra richness |
For the Topping
| Amount | Ingredient | Notes |
|---|---|---|
| 1 1/2 cups | heavy whipping cream | whipped to soft peaks |
| 1/4 cup | confectioners’ sugar | sweetens whipped cream |
| 2 tablespoons | cocoa powder | for dusting |
Preparation Methods
Folding: Folding is a technique used to gently combine a light, airy mixture with a heavier one. It is crucial to maintain the cake's light texture. Use a spatula to cut through the center of the mixture, then scoop and turn the batter over repeatedly.
Whipping Egg Whites: Whipping egg whites involves beating them until they form soft peaks. This step is key for achieving a fluffy cake. Ensure your bowl and beaters are clean and dry for best results.
Soaking: Soaking involves allowing the cake to absorb the milk mixture. This step is vital for the cake's signature moistness. Pour the milk mixture slowly and evenly over the cake, allowing it to be absorbed gradually.
Step 1: Prepare Ingredients

Preheat your oven to 350°F (175°C).
Gather all ingredients and measure them accurately.
Separate the egg yolks from the whites.
Ensure all ingredients are at room temperature for even mixing.
Step 2: Mix Dry Ingredients

In a large bowl, sift together the flour, cocoa powder, baking powder, and salt.
Mix the dry ingredients until well-combined.
Look for a uniform color and texture.
Ensure there are no lumps in the mixture.
Step 3: Beat Egg Yolks and Sugar

In another bowl, beat egg yolks with half the sugar until pale and creamy.
Use an electric mixer for about 5 minutes.
The mixture should double in volume.
Check that it falls from the beaters in thick ribbons.
Step 4: Whip Egg Whites

In a clean bowl, beat the egg whites until soft peaks form.
Gradually add the remaining sugar while continuing to beat.
The mixture should become glossy and hold peaks.
Be careful not to overmix to prevent collapsing.
Step 5: Combine Mixtures

Gently fold the egg yolk mixture into the dry ingredients.
Add the whipped egg whites in thirds, folding gently each time.
Ensure the batter is smooth and even, with no streaks.
Use a spatula to avoid deflating the air.
Step 6: Bake the Cake

Pour the batter into a greased springform pan.
Smooth the top with a spatula.
Bake for 30-35 minutes until a toothpick inserted comes out clean.
The cake should spring back when lightly touched.
Step 7: Prepare Milk Mixture

In a large measuring cup, combine sweetened condensed milk, evaporated milk, and heavy cream.
Mix until smooth and well combined.
The mixture should have a consistent color and texture.
Set aside to soak the cake.
Step 8: Soak the Cake
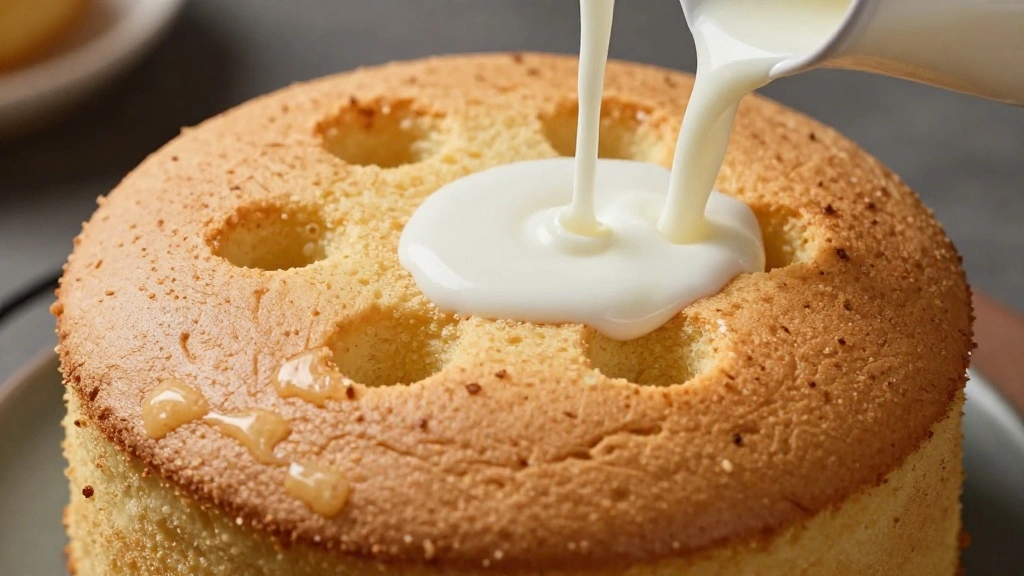
Once the cake is cool, poke small holes across the surface with a fork.
Slowly pour the milk mixture over the cake, allowing it to absorb.
Ensure the cake is evenly soaked.
Refrigerate for at least 2 hours or overnight.
Step 9: Prepare Whipped Cream Topping

In a chilled bowl, beat heavy cream and confectioners' sugar until soft peaks form.
Ensure the cream is cold for best whipping results.
The whipped cream should hold its shape when lifted.
Refrigerate until ready to use.
Step 10: Assemble and Serve
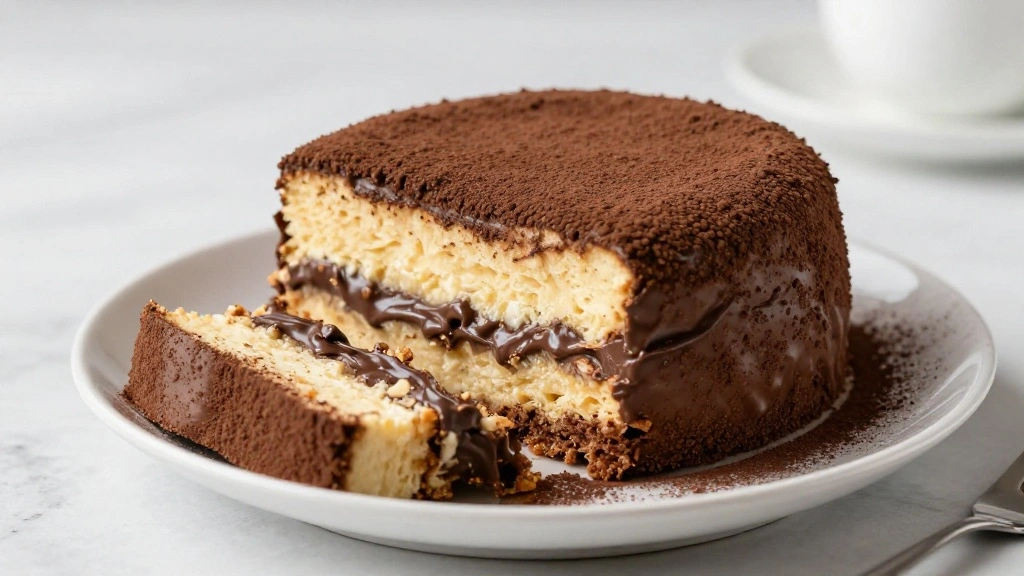
Spread the whipped cream evenly over the soaked cake.
Dust with cocoa powder using a fine sieve.
Slice and serve chilled.
Each piece should showcase the layers distinctly.
Critical Timing and Temperature Guide
Baking the Cake: Bake at 350°F (175°C) for 30-35 minutes. The cake is done when a toothpick inserted in the center comes out clean. Avoid overbaking to prevent dryness.
Cooling and Soaking: Allow the cake to cool completely before soaking with the milk mixture. Refrigerate for at least 2 hours for optimal absorption.
Whipping Cream: Whip cream when it's cold, and stop as soon as soft peaks form. Overwhipping can lead to a grainy texture.
Pro Tips for Chocolate Tres Leches
• Ingredient Selection: Use high-quality cocoa powder and fresh dairy products for the richest flavor and texture.
• Preparation Secret: Separating and whipping the egg whites separately leads to a lighter, airier cake.
• Temperature Management: All ingredients should be at room temperature before mixing for a uniform batter.
• Texture Enhancement: Folding in whipped egg whites gently prevents the batter from deflating, ensuring a fluffy cake.
• Flavor Layering: Infusing the milk mixture with a pinch of cinnamon or coffee can enhance the chocolate flavor.
• Make-Ahead Strategies: The cake improves in flavor and texture when made a day in advance and allowed to soak overnight.
• Restaurant-Quality Finishing Touches: Use a fine-mesh sieve to evenly dust cocoa powder on top for a professional finish.
• Equipment Optimization: Make sure to chill the bowl and beaters before whipping cream for the best results.
Troubleshooting Common Issues
• Cake Too Dense: This can occur if the egg whites were not whipped enough. Ensure they reach soft peaks before folding in.
• Cake Not Soaking Properly: If the cake is too dry, make sure to poke enough holes before pouring the milk mixture.
• Whipped Cream Too Runny: This happens when the cream is not cold enough. Always use cream straight from the fridge.
• Uneven Soaking: Pour the milk mixture slowly and evenly across the entire surface of the cake.
• Cake Sticking to Pan: Use a non-stick springform pan and grease it well before baking.
• Flavor Not Balanced: Ensure you are using unsweetened cocoa powder and adjust sugar levels if it's too sweet.
Variations and Regional Differences
• Mexican Variation: Often incorporates a splash of coffee or cinnamon in the milk mixture for a spiced flavor.
• Caribbean Style: Includes rum or coconut milk in the soaking liquid for a tropical twist.
• Venezuelan Version: Uses Venezuelan chocolate for a deeper, more intense chocolate flavor.
• American Adaptation: Sometimes topped with chocolate shavings or ganache for extra indulgence.
Food Science Behind the Recipe
• Emulsification: The process of combining egg yolks and sugar creates a stable emulsion that provides structure to the cake.
• Aeration: Whipping egg whites incorporates air, which helps the cake rise and gives it a light texture.
• Gelatinization: As the cake bakes, the starch in the flour absorbs liquid and swells, firming up the structure.
Frequently Asked Questions
What's the most common mistake people make when preparing Chocolate Tres Leches Cake? Overbaking the cake, which leads to a dry texture and poor absorption of the milk mixture.
Can I use sweetened cocoa powder? It's best to use unsweetened cocoa powder to control the sweetness of the cake.
How long should I refrigerate the cake after soaking? At least 2 hours, but overnight is ideal for the best texture and flavor.
Can I make this cake with a gluten-free flour? Yes, a 1:1 gluten-free flour substitute can be used, but results may vary slightly.
What if I don't have a springform pan? A deep cake pan will work, as long as it is well-greased and lined with parchment paper.
Can I substitute the heavy cream in the milk mixture? Yes, half-and-half can be used, but the result may be less rich.
How can I make the cake more chocolatey? Adding chocolate chips to the batter or a layer of chocolate ganache on top can intensify the chocolate flavor.
Serving and Presentation Guide
• Traditional Presentation: Serve the cake directly from the pan, topped with whipped cream and a dusting of cocoa powder.
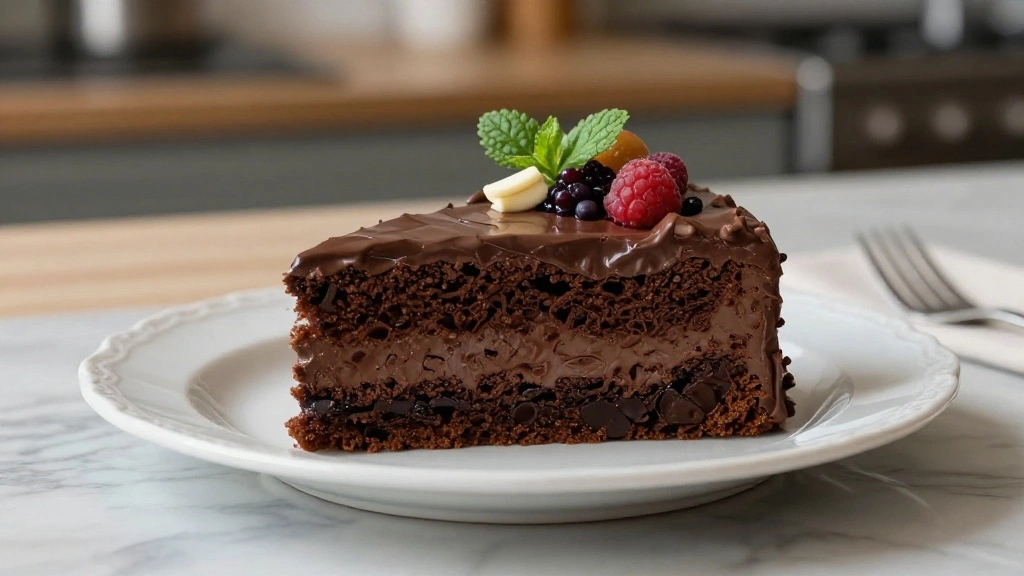
• Individual Portions: Slice into squares and garnish each piece with a chocolate curl or fresh berries for a polished look.
• Family Style: Place the whole cake on a serving platter with a knife for guests to help themselves.
• Layered Presentation: Cut the cake in half horizontally, soak each layer, and stack for a dramatic effect.
Conclusion
With its irresistible combination of moist texture and rich chocolate flavor, Chocolate Tres Leches Cake is sure to become a favorite.
The steps are simple, yet the result is a stunning dessert that will impress family and friends alike.
Give this recipe a try, and experience the joy of a classic dessert with a delicious twist.