
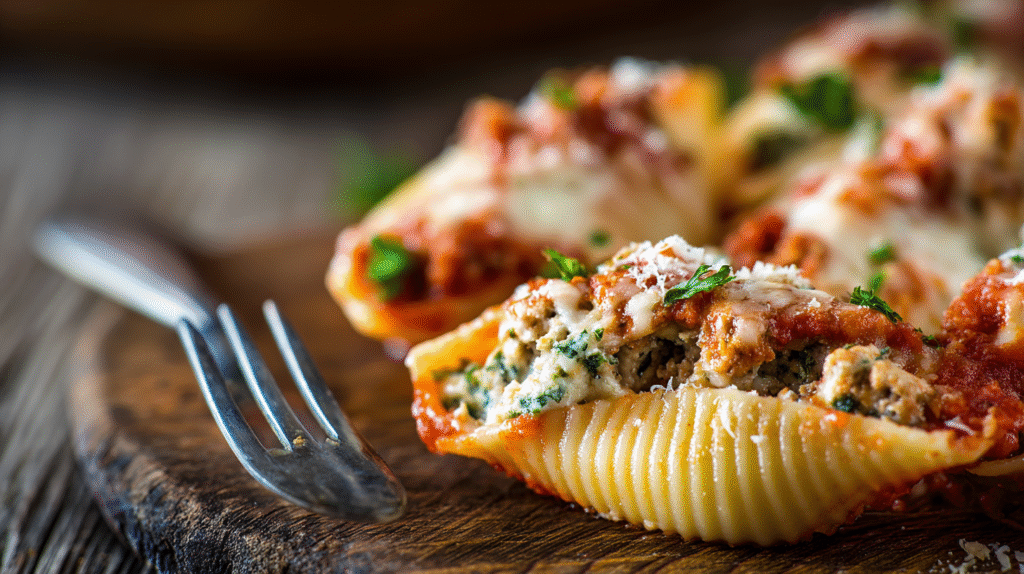
The Perfect Stuffed Shells Recipe
Creating perfect stuffed shells is easier than you might think. This recipe yields about 24 stuffed shells that serve 6-8 people generously. Your family will request this dish again and again once they taste these cheesy pasta pillows bathed in rich tomato sauce.
Ingredients
For the shells and filling:
- 24 jumbo pasta shells
- 2 tablespoons olive oil
- 3 cups ricotta cheese (whole milk preferred)
- 2 cups shredded mozzarella cheese divided (1½ cups for filling ½ cup for topping)
- ½ cup grated Parmesan cheese plus more for serving
- 2 large eggs lightly beaten
- 3 garlic cloves minced
- ¼ cup fresh basil chopped plus more for garnish
- 2 tablespoons fresh parsley chopped
- 1 teaspoon dried oregano
- ½ teaspoon salt
- ¼ teaspoon black pepper
For the sauce:
- 3 cups marinara sauce (homemade or store-bought)
Instructions
- Preheat your oven to 375°F (190°C) and bring a large pot of salted water to a boil.
- Cook jumbo shells according to package directions until al dente (usually 8-9 minutes). Be careful not to overcook as they’ll need to hold their shape for stuffing. Drain and rinse with cool water.
- Drizzle shells with olive oil and gently toss to prevent sticking. Set aside while preparing the filling.
- In a large mixing bowl combine ricotta cheese 1½ cups mozzarella Parmesan eggs minced garlic chopped basil parsley oregano salt and pepper. Mix thoroughly until all ingredients are well incorporated.
- Spread 1 cup of marinara sauce across the bottom of a 9×13 inch baking dish.
- Fill each pasta shell with approximately 2 tablespoons of the cheese mixture. A small spoon or piping bag works well for this task.
- Arrange stuffed shells in the prepared baking dish with the opening facing upward.
- Pour the remaining 2 cups of marinara sauce over the shells ensuring each is covered with some sauce.
- Sprinkle the remaining ½ cup of mozzarella cheese over the top of the shells.
- Cover the baking dish with aluminum foil and bake for 25 minutes.
- Remove foil and bake for an additional 10 minutes until cheese is bubbly and edges begin to brown.
- Let the stuffed shells rest for 5-10 minutes before serving.
- Garnish with additional fresh basil and Parmesan cheese if desired.
Cooking Tips
Slightly undercook your pasta shells since they’ll continue cooking in the oven. This prevents them from becoming mushy during baking.
For the creamiest filling possible drain your ricotta cheese by placing it in a fine-mesh strainer lined with cheesecloth for 30 minutes before mixing with other ingredients.
Test one shell for proper seasoning before filling all your shells. Adjust salt and pepper as needed based on your taste preference.
When stuffing shells hold them in your hand to prevent tearing and use a small spoon to fill each one completely.
Leftover stuffed shells store beautifully in the refrigerator for up to 3 days. Simply reheat in a 350°F oven until warmed through.
Why You’ll Love This Classic Italian Dish
Stuffed shells deliver an irresistible combination of flavors and textures that will transport you straight to an Italian trattoria. The tender pasta shells cradle a rich ricotta filling while marinara sauce provides the perfect tangy complement to each bite.
Your dinner guests will be impressed by this visually stunning dish that looks like it took hours to prepare but actually comes together with minimal effort. The jumbo shells create natural portion sizes making serving both elegant and practical.
These shells offer incredible versatility allowing you to tailor the recipe to your preferences. Add spinach for extra nutrition swap in different cheeses or incorporate ground meat for a heartier version – the possibilities are endless.
Make-ahead convenience transforms this dish into a weeknight lifesaver. Prepare everything up to 24 hours before baking or freeze assembled shells for up to three months when you need a quick homemade meal solution.
Budget-friendly ingredients make stuffed shells an economical choice for feeding a crowd. Basic pantry staples and affordable dairy products transform into a restaurant-worthy meal that stretches your grocery dollars without sacrificing flavor.
Perfect for meal prep enthusiasts these stuffed shells reheat beautifully maintaining their delicious taste and texture for several days. Each serving provides a satisfying meal packed with protein from the cheese mixture and comforting carbohydrates from the pasta.
Ingredients Needed

Gather these quality ingredients to create your homemade stuffed shells that will rival any Italian restaurant. The components are organized by their role in the recipe for easy preparation.
For The Pasta
- 1 box (12 oz) jumbo pasta shells
- 2 tablespoons salt (for pasta water)
- 1 tablespoon olive oil (for pasta water)
For The Cheese Filling
- 32 oz whole milk ricotta cheese, drained
- 2 cups shredded mozzarella cheese, divided
- 1 cup freshly grated Parmesan cheese, divided
- 2 large eggs, lightly beaten
- 3 cloves garlic, minced
- 1/4 cup fresh basil, chopped
- 2 tablespoons fresh parsley, chopped
- 1 teaspoon dried oregano
- 1/2 teaspoon salt
- 1/4 teaspoon black pepper
- 1/8 teaspoon ground nutmeg (optional)
For The Marinara Sauce
- 4 cups marinara sauce (homemade or high-quality store-bought)
- 1 tablespoon olive oil (if making homemade sauce)
- 1 small onion, finely diced (if making homemade sauce)
- 2 cloves garlic, minced (if making homemade sauce)
- 1 can (28 oz) crushed tomatoes (if making homemade sauce)
- 1 tablespoon tomato paste (if making homemade sauce)
- 1 teaspoon dried basil (if making homemade sauce)
- 1/2 teaspoon dried oregano (if making homemade sauce)
- Salt and pepper to taste (if making homemade sauce)
For Topping
- 1 cup shredded mozzarella cheese (reserved from filling ingredients)
- 1/4 cup freshly grated Parmesan cheese (reserved from filling ingredients)
- 2 tablespoons fresh basil, thinly sliced or torn (for garnish)
- Red pepper flakes (optional, for serving)
Equipment Required

Before diving into the stuffed shells preparation process you’ll need to gather the right kitchen tools. Having everything ready will make your cooking experience smoother and more enjoyable.
- Large pot – For boiling the jumbo pasta shells (at least 6-quart capacity recommended)
- Colander – To drain the cooked pasta shells
- Mixing bowl (large) – For combining the ricotta cheese filling ingredients
- 9×13 inch baking dish – The perfect size for holding about 24 stuffed shells
- Measuring cups and spoons – For accurate ingredient measurements
- Wooden spoon or spatula – For mixing the filling
- Tablespoon or small cookie scoop – Helps portion the filling evenly into each shell
- Aluminum foil – To cover the dish while baking
- Cutting board and knife – For chopping herbs and garlic
- Cheese grater – If using block cheese rather than pre-shredded
- Small bowl – For beaten eggs before adding to the filling
- Rubber spatula – For scraping every bit of delicious filling from the bowl
Your baking dish should be deep enough to accommodate the shells and sauce without overflow. Many cooks prefer a ceramic or glass dish for even heating but a metal pan works well too. If planning to freeze the dish before baking ensure your selected bakeware is freezer-safe.
How To Make Stuffed Shells
Creating restaurant-quality stuffed shells at home is simpler than you might think. Follow these step-by-step instructions to prepare this classic Italian-American dish that’s perfect for family gatherings and special occasions.
Preparing The Pasta
Cook the jumbo pasta shells in a large pot of salted water according to package directions but reduce the cooking time by 1-2 minutes. This slight undercooking ensures the shells remain firm enough to stuff without tearing. Add 1 tablespoon of olive oil to the boiling water to prevent the shells from sticking together. Drain the shells in a colander and rinse with cold water to stop the cooking process immediately. Lay the shells on a baking sheet lined with parchment paper to prevent them from sticking together while you prepare the filling. Select shells that have maintained their shape well and discard any broken ones as they’ll be difficult to fill.
Making The Cheese Filling
Combine 15 ounces of whole milk ricotta cheese with 1½ cups shredded mozzarella and ½ cup grated Parmesan in a large mixing bowl. Add 1 beaten egg to bind the mixture together and prevent it from becoming too runny during baking. Mix in 2 minced garlic cloves for flavor along with 2 tablespoons of freshly chopped basil and 1 tablespoon of parsley. Season the mixture with ½ teaspoon salt ¼ teaspoon black pepper and a pinch of nutmeg to enhance the flavors. Stir until all ingredients are thoroughly combined but avoid overmixing which can make the filling dense. Test the consistency by scooping some with a spoon – it should hold its shape without being too stiff.
Assembling The Shells
Spread 1 cup of marinara sauce evenly across the bottom of a 9×13-inch baking dish. Take each cooked pasta shell and gently open it to create a pocket for filling. Spoon approximately 1½-2 tablespoons of the cheese mixture into each shell using either a small spoon or a piping bag for neater results. Place the filled shells open-side up in the prepared baking dish arranging them in a single layer. Position them close together to help them stay upright during baking. Pour the remaining marinara sauce over and around the shells ensuring they’re well-covered but not completely submerged. Sprinkle an additional ½ cup of shredded mozzarella and 2 tablespoons of Parmesan over the top for a golden cheesy crust.
Baking Instructions
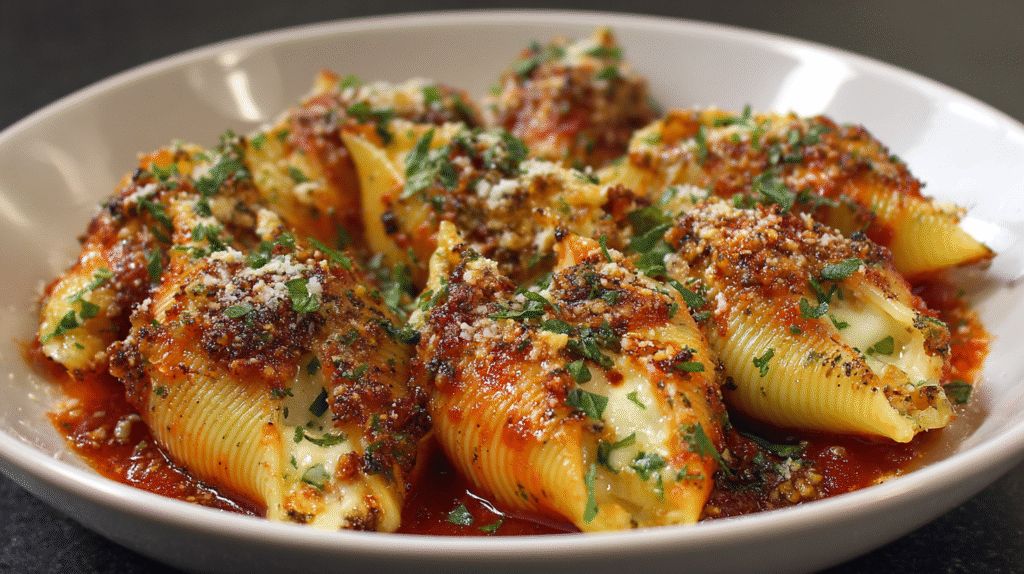
Preheat your oven to 375°F (190°C) before you begin assembling the shells. Cover the baking dish with aluminum foil making sure it doesn’t touch the cheese topping. Bake the covered shells for 25 minutes until the sauce is bubbling around the edges and the filling is hot throughout. Remove the foil and continue baking for an additional 10 minutes until the cheese on top turns golden brown and forms a slightly crispy layer. Test for doneness by inserting a knife into the center of one shell – it should come out hot. Let the stuffed shells rest for 5-10 minutes after removing from the oven to allow the filling to set and make serving easier. Garnish with additional fresh basil leaves just before serving for a bright flavor and appealing presentation.
Tips For Perfect Stuffed Shells
Elevate your stuffed shells from good to spectacular with these expert tips that address common challenges and enhance flavor. Follow these professional techniques to achieve restaurant-quality results every time.
Don’t Overcook the Pasta
Cook your jumbo shells just until al dente or even slightly underdone (about 8-9 minutes). The pasta will continue cooking in the oven so starting with firmer shells prevents them from becoming mushy or falling apart during baking. Test a shell by removing it from the boiling water and checking that it’s pliable enough to stuff but still has some firmness.
Drain and Cool Shells Properly
After cooking drain your shells thoroughly then lay them out individually on a baking sheet lined with parchment paper. This prevents them from sticking together and makes them easier to handle when stuffing. A light drizzle of olive oil while they’re cooling helps prevent sticking and cracking.
Remove Excess Moisture From Ricotta
For a thicker creamier filling drain your ricotta before mixing the cheese filling. Place it in a fine-mesh strainer lined with cheesecloth or paper towels and let it sit for 30 minutes to remove excess whey. This creates a more concentrated flavor and prevents a watery filling that might leak out during baking.
Season Generously
Don’t be shy with herbs and seasonings in your filling. The pasta and cheese can absorb a lot of flavor so taste your filling mixture before stuffing the shells. Remember that flavors mellow slightly during baking so it’s better to slightly overseason than underseason.
Use a Piping Bag for Filling
Fill a piping bag or a ziplock bag with the corner snipped off with your cheese mixture for quicker cleaner filling of the shells. This technique gives you more control and helps you fill each shell evenly without messy spills.
Create a Sauce Barrier
Always spread a layer of sauce on the bottom of your baking dish before adding the stuffed shells. This prevents the pasta from sticking to the dish and adds flavor to the bottom of each shell. The sauce layer should be approximately ¼ inch thick for optimal results.
Cover During Baking
Cover your baking dish with foil for most of the cooking time to keep the shells moist. Remove the foil during the last 10 minutes of baking to allow the cheese to brown nicely. Ensure the foil doesn’t touch the cheese topping by tenting it slightly over the dish.
Let Rest Before Serving
Allow your baked stuffed shells to rest for 10-15 minutes before serving. This resting period helps the filling set and makes the shells easier to serve intact. The temperature also becomes more comfortable for eating while flavors continue to develop and meld.
Make-Ahead Tips
Prepare your stuffed shells up to 24 hours in advance and refrigerate unbaked. When ready to serve add an extra 10-15 minutes to the baking time if cooking straight from the refrigerator. For longer storage freeze unbaked shells individually on a baking sheet then transfer to a freezer container once solid.
Serving Suggestions
Serve your stuffed shells with additional warmed marinara sauce on the side for guests who enjoy extra sauce. A sprinkle of freshly grated Parmesan cheese and torn basil leaves just before serving adds a professional finishing touch that enhances both presentation and flavor.
Variations To Try
While classic cheese stuffed shells are delicious, experimenting with different fillings can transform this traditional dish into something new and exciting. Try these flavorful variations to expand your stuffed shells repertoire.
Meat Lover’s Stuffed Shells
Transform your stuffed shells into a hearty feast by incorporating various meats into the filling. Brown 1 pound of Italian sausage (casings removed) or ground beef with 1 diced onion and 2 minced garlic cloves until fully cooked. Drain excess fat before mixing the meat with your cheese filling. For an elevated version, add 4 ounces of diced pepperoni or 6 ounces of crispy bacon pieces to the mixture. You can also experiment with a combination of meats like ground veal and pork for a more complex flavor profile. These protein-packed shells pair beautifully with a robust marinara or meat sauce for an extra satisfying meal that will please even the most dedicated carnivores at your table.
Vegetable Stuffed Shells
Add nutritional value and vibrant flavors to your stuffed shells by incorporating vegetables into the filling. Sauté 10 ounces of fresh spinach until wilted or thaw and drain a 10-ounce package of frozen spinach, then squeeze out all excess moisture before mixing with your cheese filling. Roasted vegetables work wonderfully too – try 1 cup of diced roasted red peppers, 1 cup of sautéed mushrooms, or 1 cup of roasted eggplant cubes. For a Mediterranean twist, mix in ½ cup of chopped artichoke hearts, ¼ cup of sun-dried tomatoes, and 2 tablespoons of chopped kalamata olives. Fresh herbs like basil, oregano, and thyme brighten the vegetable fillings and complement the cheesy base perfectly. These colorful variations are ideal for vegetarians or anyone looking to incorporate more vegetables into their meals.
Seafood Stuffed Shells
Elevate your stuffed shells to an elegant dinner option by incorporating seafood into the filling. Fold 8 ounces of lump crabmeat or 8 ounces of chopped cooked shrimp into your cheese mixture along with 1 tablespoon of lemon zest and 2 tablespoons of chopped fresh dill or parsley. For a more luxurious version, add 4 ounces of chopped smoked salmon with 2 tablespoons of capers and 1 tablespoon of fresh dill. Seafood shells pair exceptionally well with lighter sauces like a creamy alfredo or a simple lemon butter sauce instead of traditional marinara. These sophisticated shells make an impressive main course for special occasions or dinner parties. The delicate seafood flavors require a gentle touch when mixing to maintain their integrity throughout the preparation process.
Make-Ahead And Storage Instructions
Stuffed shells are perfect for meal prep because they can be prepared in advance when you have time and enjoyed later when you need a quick meal. Here’s how to make the most of this dish’s versatility:
Refrigerating Before Baking
Prepare the entire dish up to 24 hours before you plan to serve it. Assemble the stuffed shells in your baking dish then cover tightly with plastic wrap or aluminum foil. Store in the refrigerator until ready to bake. When it’s time to cook, remove from the refrigerator about 30 minutes before baking to allow the dish to come to room temperature. Add an extra 10-15 minutes to the baking time if the shells are still cold.
Freezing Instructions
Stuffed shells freeze beautifully for longer storage:
- Unbaked Method: Assemble the stuffed shells in a freezer-safe baking dish. Cover tightly with a layer of plastic wrap followed by aluminum foil. Freeze for up to 3 months. Label with the date and baking instructions for future reference.
- Individual Freezing: Place filled shells on a parchment-lined baking sheet without sauce. Freeze until solid (about 2 hours) then transfer to freezer bags. Store sauce separately. This method allows you to take out exactly what you need.
- Baking From Frozen: Add 20-30 minutes to the baking time when cooking directly from frozen. Keep the dish covered with foil until the last 10 minutes of baking.
Refrigerating Leftovers
Store leftover baked stuffed shells in an airtight container in the refrigerator for up to 4 days. The flavors often improve after a day as the ingredients meld together making leftovers particularly delicious.
Reheating Guidelines
For the best texture when reheating:
- Oven Method: Place leftover shells in a baking dish with a splash of extra sauce. Cover with foil and bake at 350°F for 15-20 minutes until heated through.
- Microwave Method: For single servings place 2-3 shells in a microwave-safe dish with a tablespoon of water or extra sauce. Cover with a microwave-safe lid or paper towel and heat on medium power for 2-3 minutes checking halfway through.
- Frozen Leftovers: Thaw overnight in the refrigerator before reheating for the most even warming and best texture.
Adding a sprinkle of fresh grated Parmesan cheese before serving reheated stuffed shells helps refresh the flavor and restore some of the original appeal.
Serving Suggestions
Transform your stuffed shells from a simple pasta dish into an impressive dinner experience with these serving ideas:
Create a Complete Italian Feast
Pair your stuffed shells with garlic bread or focaccia to soak up extra sauce. Add a crisp Caesar salad or arugula salad with lemon vinaigrette for freshness that balances the rich cheesy pasta. Your guests will appreciate the classic Italian restaurant experience recreated at home.
Wine Pairings
Select a medium-bodied red wine like Chianti or Sangiovese that complements the tomato sauce without overpowering the delicate cheese filling. If you prefer white wine a Pinot Grigio or unoaked Chardonnay works beautifully with the creamy ricotta. Serving wine elevates the meal for special occasions.
Family-Style Presentation
Bring the entire baking dish to the table for a dramatic presentation. Sprinkle fresh basil leaves and additional Parmesan cheese right before serving. This rustic serving style encourages sharing and conversation around the table.
Individual Plating Ideas
For more elegant presentations serve 2-3 shells per person on warmed plates. Drizzle additional warmed marinara sauce in a decorative pattern around the shells. Garnish with a small basil sprig and a light dusting of grated Parmesan for restaurant-quality plating.
Side Dish Suggestions
Roasted vegetables like asparagus zucchini or bell peppers provide colorful accompaniments. Sautéed broccoli rabe or garlicky spinach adds a nutritious element that complements the rich pasta dish. These sides add visual appeal and nutritional balance to your meal.
Make It a Meal
Serve stuffed shells alongside Italian sausages or grilled chicken for guests who prefer additional protein options. This combination transforms the dish into a hearty feast suitable for larger gatherings or hungry families.
Kid-Friendly Serving
For family dinners with children serve smaller portions with extra cheese on top. Provide garlic bread sticks for dipping into the sauce. This approach makes the meal more interactive and appealing for younger diners.
Holiday Presentation
For special occasions arrange the stuffed shells in a circular pattern in a round baking dish. Garnish with fresh herbs and edible flowers for an impressive centerpiece at holiday gatherings or dinner parties.
What To Serve With Stuffed Shells
Stuffed shells shine as the star of your meal but pairing them with complementary sides elevates the dining experience. These classic Italian-American pasta vessels deserve thoughtful accompaniments that balance their rich cheese filling and savory marinara sauce.
Bread Options
Fresh garlic bread makes an ideal companion to stuffed shells, perfect for sopping up extra sauce. Try ciabatta or a crusty Italian loaf brushed with garlic butter and toasted until golden. Focaccia studded with rosemary and sea salt offers a flavorful alternative that complements the herbs in your stuffed shells filling.
Salad Pairings
A crisp green salad provides refreshing contrast to the hearty pasta dish. Caesar salad with its garlicky dressing and crunchy croutons cuts through the richness of the cheese filling. An arugula salad with lemon vinaigrette, shaved Parmesan and toasted pine nuts adds peppery notes that balance the creamy shells. For a more substantial option, consider an Italian chopped salad featuring salami, provolone and pepperoncini.
Vegetable Sides
Roasted vegetables develop caramelized flavors that pair beautifully with stuffed shells. Brussels sprouts roasted with balsamic glaze or broccoli tossed with garlic and red pepper flakes provide texture and nutritional balance. Sautéed spinach with lemon complements the flavors in the stuffed shells while adding vibrant color to your plate.
Protein Additions
While stuffed shells offer protein from their cheese filling, you might want additional options for heartier appetites. Italian sausages cooked with peppers and onions make a flavorful side dish. Grilled chicken breasts seasoned with Italian herbs provide a lighter protein option that doesn’t compete with the shells’ richness.
Wine Pairings
Choose wines that complement rather than overpower the tomato and cheese flavors. Medium-bodied reds like Chianti or Montepulciano cut through the richness with their acidity. Prefer white? Pinot Grigio or Vermentino offer crisp counterpoints to the creamy filling. Sangiovese works particularly well with tomato-based sauces, making it an excellent choice for stuffed shells.
Complete Menu Ideas
For a casual family dinner:
- Stuffed shells
- Simple green salad with Italian dressing
- Garlic bread
- Roasted broccoli
For a special occasion:
- Antipasto platter starter
- Stuffed shells
- Sautéed spinach with garlic
- Focaccia
- Tiramisu for dessert
Remember that balance creates the most satisfying meal experience. The acidic tomato sauce and rich cheese filling of stuffed shells pair wonderfully with crisp vegetables, fresh bread and complementary flavors that round out your Italian feast.
Conclusion
Stuffed shells deliver restaurant-quality taste with minimal effort right in your home kitchen. This adaptable Italian-American classic fits perfectly into your meal rotation whether you’re hosting a dinner party or planning weeknight meals.
You’ll love how easily these cheesy delights can be customized to suit your preferences and dietary needs. The make-ahead and freezer-friendly nature of this dish makes it a smart choice for busy households.
With just a few simple ingredients and techniques you’ve mastered a crowd-pleasing meal that offers both comfort and elegance on one plate. So grab your baking dish and create this irresistible pasta dish that’ll have everyone asking for seconds!